Thursday, December 27, 2012

Christmas/Christmas dresses!"

"Will smile for Candy"
Trying to get little sissy to smile...I don't think she's having it!

I have been so busy with Christmas and an impending move that I got my Christmas dresses sewn a little later than I would have liked this year.  I used an existing dress as a bodice pattern for my 3 year old daughter and 2 year old niece, then made a onesie dress for my 10 month old.  I used all Michael Miller fabrics (love!!!)  The only request the older girls had was that they be "twirly" so I made circle skirts to attach the the bodice!
Attempt one...
Attempt two...
...and an escapee for attempt three.
Hopefully you can see how I made each a little different.  LJ had the flower pattern bodice, green sash, and dotted skirt.  Lil had a green bodice with bows above the shoulder buttons, red ribbon sash, and floral pattern skirt.  Stella had the floral skirt and the green and polka dot double layered bow at the shoulder.  They each had fabric flower hairclips (headband for Stella).  I love making matching outfits that are each individual like these.  Plus, it keeps me from getting bored when making the same pieces a couple times.
Coming down the stairs to see what Santa brought!

Now, on to Christmas morning.  Did you all have a great Christmas?  LJ is 3 this year, so it was the first time she was really in to it.  She understood Santa, Elf on the Shelf, and was excited about what she asked for.  It actually was funny- she said she wanted Bullseye from Toy Story so her Jesse and Woody could ride him.  For two months that was all she talked about asking Santa for.  Then, when she sat on his lap she said she wanted a "Pink Skateboard with handles" (aka a scooter).  My husband looked at me in alarm, but when we got home I proudly showed him the pink scooter in the office.  I had snatched one up on a whim at the Kohl's black Friday sale.  I guess I know my girl better than I thought!
She wanted Mommy to wear her new Jesse hat, of course I secretly enjoyed wearing a red glittery hat!

 On Christmas morning, she made us proud by helping her baby sister with her gifts from Santa before ever touching her own.  I swear she is normally not a perfect child, but in that moment I was so happy to see that we are doing a good job raising a sweet and caring girl, even if she doesn't show it all the time!

As much as I love the presents and the outfits and the COOKIES- I really am thankful to have a loving family, a nice roof over my head, healthy children, and my faith in God.  In light of recent events, sharing this Christmas with my family felt even more like a gift.

Thanks to all of you who care to read what I have to say, I am thankful for you too!  I know I haven't offered up many tutorials for you lately, but I am hoping to change that now that Stella is a little older.  I am full of ideas for projects!

Until then, have a HAPPY NEW YEAR!


Thursday, December 13, 2012

Christmas Craft Night

Merry Christmas!!! 

Hello all!  It has been a while.  I told you that I was going to take it easy on blogging to focus on my two girls and I have stuck to it (by the way, my stinky little 9 month old is walking- WALKING!  Crazy!)  That doesn't mean I haven't been keeping busy up in my craft room, though!

I have been a sewing machine- I made a few Christmas outfits to make a little cash before the Holidays, I hosted my annual Christmas Craft Night (more on that below), I've been making a few gifts, and I have some Christmas dresses in the works for my girls and my niece.  Whew!  I could use about 100 hours alone up there to get it all done :)

Christmas Craft Night was a success this year! (Well, except for the tummy bug everyone came down with two days later...stupid viruses!) I've got it down to a science finally.  Updated guidelines:
-No more than 10 guests
-Have them each pitch in $5 instead of having them each bring a supply
-Have everyone bring a snack to share
-Only 3 easy, affordable projects

I provided all supplies (I spent more than $5 per person, but at least the $5 each helped!), some snacks, all drinks, and instructions.
This year's projects were:

Freezer Paper Stenciling on pillow covers (I sewed them all!)
Materials needed: fabric to stencil on, silhouettes of images printed in b/w, exacto knife fabric paint, sponge brush, freezer paper, and an iron. 
 Instructions:  Lay freezer paper over the image you choose.  Use an exacto knife to carefully cut out image.  Iron the freezer paper stencil onto the fabric (no steam and medium heat!)  Then paint lightly, allow to dry, and peel off freezer paper.  Then iron again to heat set the paint!  Voila!

Upcycled Jar Snow Globes
Materials:  clean empty glass jars (any type), liquid glycerin, white glitter, plastic snowflakes, tiny figurines (I raided the mini Christmas tree ornament aisle), hot glue
Instructions:  Glue figurines in the lid of the jar, being careful to keep them inside the seal area. (Otherwise your jar won't close!)  In the jar itself, place some glitter, snowflakes, a few drops of glycerin, and purified water.  Place lid on jar, and hot glue around the edge to be sure its sealed!  EASY!!!

Salt Dough Ornaments/Gift Tags
Materials Needed: Salt, flour, water, cookie cutters, and optional- foam Christmas stamps (found mine at Hobby Lobby)
Instructions- Stir together 1/2 cup salt, 1 cup flour, and 1/2 cup water.  Add food coloring if desired.  Roll out like cookies- about 1/2" thick.  Cut out shapes and use stamps for texture or design. (I used the snowflake stamp for these but also had a snowman, gift box, santa, etc.)  Bake at 225 degrees F until dried out, approximately 3 hours.  Then add glitter, paint, etc. to decorate! 
I had everyone bring their own home to bake or offered to bake them and deliver at another time.


Do you craft with your friends at Christmas?  If so, what are your favorite ones to make with a crowd?  I'm already gathering ideas for next year's party!!!
Have a fantastic Christmas and I hope to find time to blog a little more often, I really love sharing my ideas with you and hearing yours too!!!

Sunday, November 11, 2012

Violette Field Threads pattern review- Josephine

In her "Josephine" blouse.

Hi, I've still been MIA!  Still sewing, crafting, entertaining, and decorating...just not finding a lot of time to photograph it and blog about it!
I hope to show off some of my Christmas sewing soon- dresses for the girls as well as plenty of Christmas skirts, tie shirts, and onesie dresses that I am selling. (Just a one-time Christmas thing for now, no shop open permanently).
I also grabbed some cute flannel at Joann's this week to make PJ pants.

BUT as to the topic of this post, LJ had her 3rd birthday!  Per her instructions, it was an "Ocean, Mermaid, Fishy, Shark" party.  In that order, haha!  I always sew a birthday outfit, and this year with two kids it was much harder.  My sister AND sister-in-law had to come over to help me with the baby so I had time to sew.  They also majorly helped me clean, so I owe them big time! 
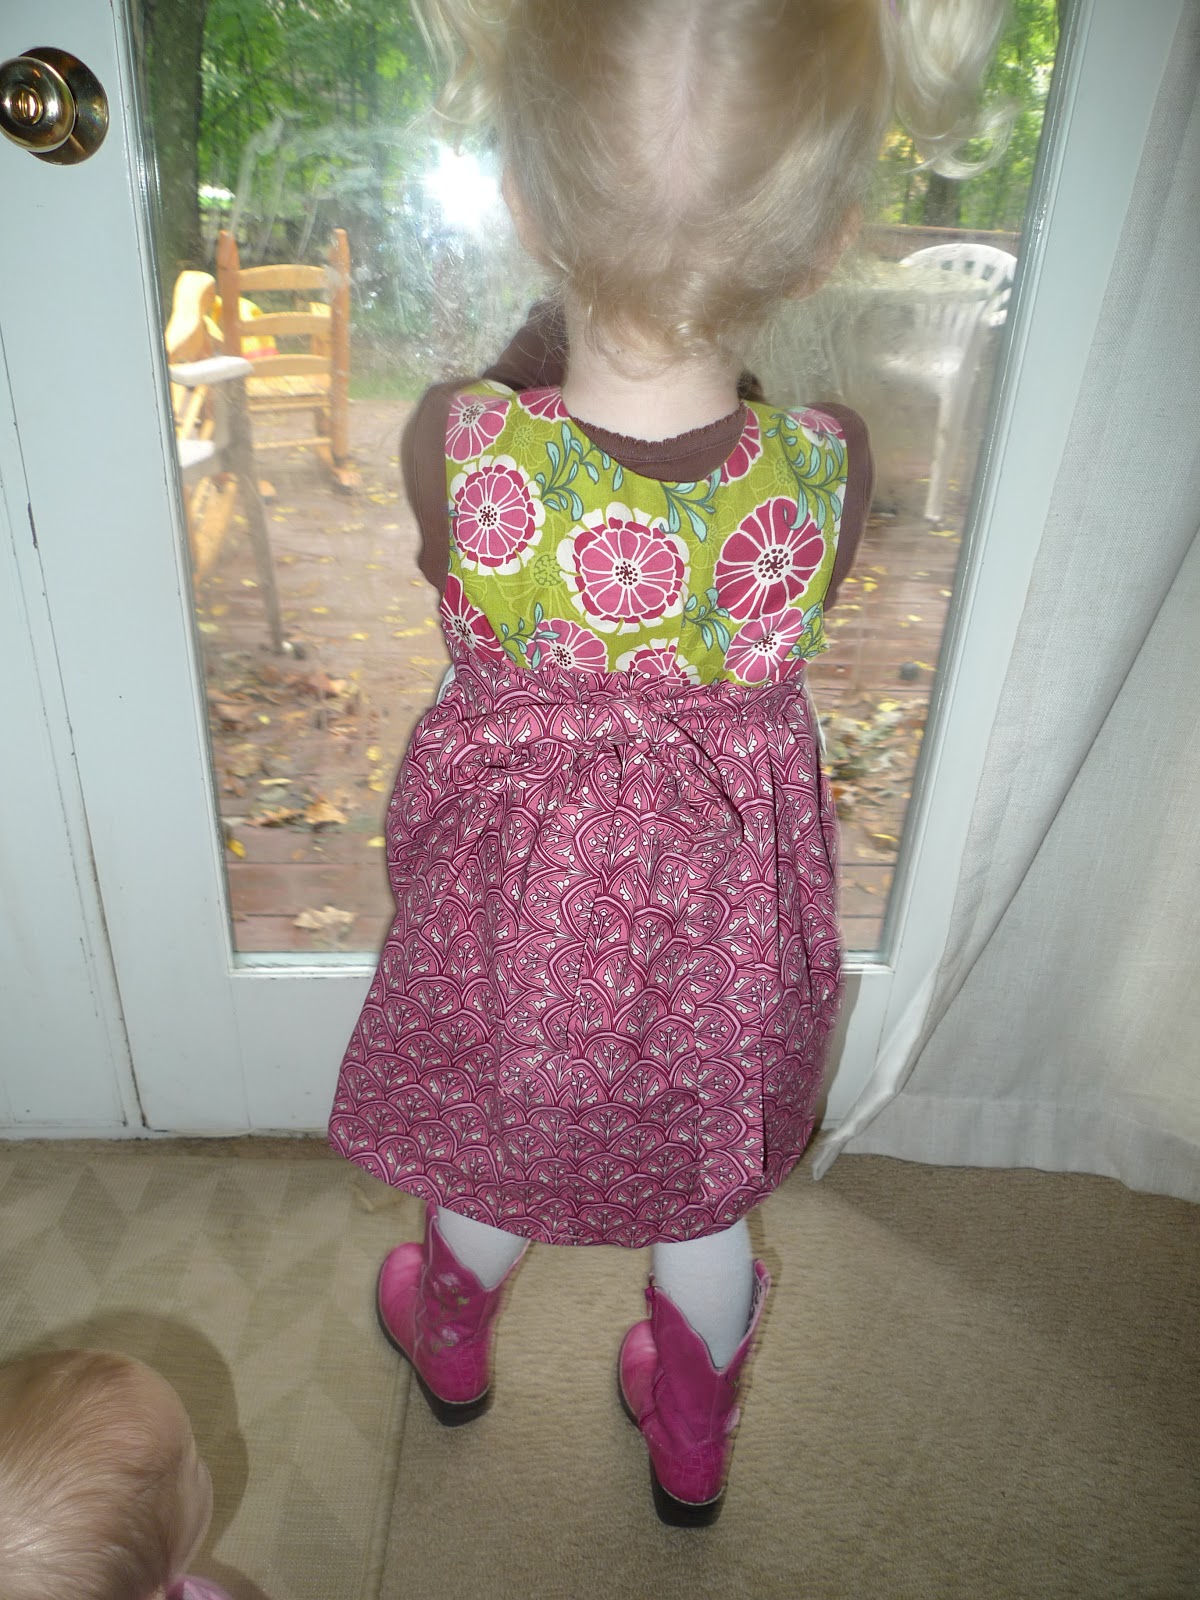
This year I opted for my first Violette Field Threads pattern.  I have always been a fan of their aesthetic, but I usually invent my own patterns since I like adventure and if I'm honest, I'm a cheapskate sometimes too.  But their PDF patterns are so affordable and super cute, so I bought two!  I intended to sew a pair of their Whitney pants to go with this top, but I ended up not having time.  Good thing she had a navy blue skirt to wear!

Her top requested gift- Jesse the cowgirl!


The details:
FABRIC- to go with the party theme, I used an adorable whale print from Joanns.  Yes, I would have loved to use the Dear Stella Anchors Away line, but time was a factor since I kinda procrastinated so I couldn't get any in time!   Then I found a yellow fabric that picked up the yellow hearts in the design.  Bright, I know.  But hey, its for a 3 year old, haha!

NOTIONS- All you need are a few buttons, depending on the size and if you want non-functioning buttons on the arm cuff.  Also, a little bias tape but I usually make it from the fabric.  I used some plain off-white buttons, as my fabric was a little "loud."

THE PATTERN-  The pattern can be made as a blouse or a dress, with long sleeves or a pretty flutter sleeve.  I chose to make the long sleeved blouse.  It has pretty pintucks and a ruffled button placket.  The sleeve is a puff sleeve.  My only fuss with the long sleeve pattern is that it does not button at the cuff.  I think this would have been good for the pattern to have because then you could roll it up a little depending on weather and to be stylin', do ya feel me?  I think they wanted a super tailored looks so that might be why they didn't have it.  It comes in sizes 2T-10.  I wish they had baby patterns too so I could make the baby a version to match, haha!

I love the collar on this blouse!


CONSTRUCTION- Overall, I believe it took me about 4 hours of fabric cutting and garment construction, which isn't too bad.  I really went against my nature and tried to be a perfectionist with this one.  The tedious part was constructing the paper pattern from the printed PDF.  So much cutting out, taping, re-taping to make it lie flat, etc.  It was a pain.  Even though as I mentioned above I can be a cheapskate, I totally want to splurge on their printed patterns for next time.  As a busy mom all this cutting and taping took up very precious time that I could have used sewing!  Lesson learned!

FIT- I followed the measurements on the chart.  LJ fell right on the line, so I chose the larger size thinking she would have room to grow.  Unfortunately, it JUST fit her perfectly (and yes, I preshrunk the fabric and followed their seam allowances).  So I would recommend going up at least one size.

OVERALL OPINION-  Very versatile pattern, GREAT instructions with detailed photos, intermediate skill set, and comes in nice size range.  If you have limited time and can afford it, buy the paper pattern, not the PDF!  Grade: A- (points off for slight sizing issue). 

Mommy and Daddy's least favorite gift- a rooster alarm clock.  Granny and Grandpa in Tennessee must have it out for us!
That's all for now, I hope I can find more time to blog soon.  I do miss it.  I have so many creative ideas and I love having this outlet for them!  Have a great Thanksgiving!!!

Thursday, October 11, 2012

I love Coconut Oil!

I have been using coconut oil for a while and now I finally feel like I've learned enough to write up a post about it!  I'm sure there are many more tips and uses out there, but this can be a start for you if you've never used it before.
Some people claim that coconut oil can help lower cholesterol, help with weight loss, aid in digestion...but I'm not sure if any of this has been proven.  These benefits would be great, but I am happy to have an organic natural oil to use in my cooking and beauty regimen!

Cooking tips:
As a butter replacer-
I have found that coconut oil works really well as a butter replacement when making grilled cheese!  It spreads up great on your bread.  It does NOT make a good "topping" so don't try to replace your butter for everything! (And use real butter, okay?  None of that weird stuff.  A little real butter won't hurt you!)  It also works as an ingredient in buttercream frosting, and bonus, the frosting is nice and white!  This could get a little expensive though!  You really could use it for any baking needs that call for butter and it works great.

As a cooking oil replacer-
Sometimes after being cooked at a high heat the coconut oil takes on a strange aftertaste, but usually it works just fine.  There is a slight coconut taste which I love, but depending on the recipe you want to use it in this might not be a good thing!  It works AWESOME to make homemade popcorn in the pan,  I love it!  I also love it for cooking fish and chicken, but not so much for eggs.  You can use it to replace oil in recipes such as quick breads and other things that call for oil.

Things it is not good for-
Its solid at room temp, so its not a good salad dressing oil.  Also, as mentioned above it is pretty flavorless so it doesn't make a good topping.


Beauty tips:

Moisturizer-
This is pretty self explanatory, I mean, its an oil, haha!  I've used it on my eczema and it works nicely.

Hair treatment-
Get your hair wet with hot water, squeeze out the excess water, then spread coconut oil and comb through.  Let it sit up in your hair wrapped in a towel, then wash out after you have let it rest for about 20 minutes.  Nice, shiny, silky hair!
A tiny dab after every washing for very dry hair (like my naturally curly mane) works wonders!
It also works as a sort of pomade.  Just be VERY careful and use a tiny bit at a time until you get the desired "look".

Natural deodorant-
I have to give my friend credit for this one.  She has been putting some on her armpits, then dabbing baking soda on top.  She said it even passed the "gardening outside in summer" test.  I have yet to try it but I just might!  What a great idea!

Make-up tips-
Stubborn waterproof mascara?  Use some coconut oil to wipe it off!
Dry lips?  That's right, rub some coconut oil on that pout!
Turn a powdered make-up into a cream- yup, mix it with a dab of coconut oil!


Like I said, I'm sure there are a million more uses, but hopefully these have inspired you to grab a jar and get started!  You will love it!

Please share your uses and tips for coconut oil below!

Monday, October 1, 2012

Keeping your identity safe!

This is a Sponsored post written by me on behalf of LifeLock Facebook for SocialSpark. All opinions are 100% mine.

Have you ever had your identity stolen?  My husband recently had his bank card hacked somehow, and thankfully we were able to get it taken care of.  But it definitely was a scare!  It got me wondering just how safe we were when it comes to our identity.  I can only imagine how horrible it would be to deal with other forms of identity theft.  In this day and age of technology being everywhere, how can you be sure you're protected?

AmeliaIZEA | skitch.com

Did you know...

• Households earning $100k + per year have the highest identity fraud rate at 7.4%
• The average cost per person of having identities stolen is $1,513
• 11.6 million adults were victims of identity fraud in 2011 and a total of $18 billion was lost.

Alarming stats for social media/ smartphone users that have experience identity fraud:
• 6.6% of victims are smartphone owners
• 6.8% of victims are social media users who click on the applications
• 8.2% of victims are social media users who have “checked in” using their smartphone GPS
• 10.1% of victims are LinkedIn users

My family fits a lot of these categories, ouch!

I checked out Lifelock.com and it looks like they can offer peace of mind.  They have what they call 5 points of protection- Monitoring your identity, Scanning for identity threats, Responding to identity theft, a Guarantee of their services, and Tracking of your credit score.  These are the benefits your get if you sign up for their services.

They also provide a site to see how safe your password is- click below!

How hack friendly is your password?

As you see, Lifelock could be a very valuable way to protect your family.  Have you used Lifelock?  Have you had your identity stolen?  Please share your experiences!  Also, check out the Lifelock Facebook page. LifeLock on Facebook

Visit Sponsor's Site

Thursday, September 27, 2012

School Pictures Apron Dress

I had bought some fabric a while back to make an apron dress.  I had a vintage tea towel in my stash that I had my eye on as a perfect "apron" for the dress.  After having my second child, I discovered that sewing time was much harder to come by!  So in the sewing room the fabric sat, for at least two months.  I finally decided to make it for LJ's school photo, but then time got away from me and I didn't get to it until the NIGHT before!!!  Eek!  Well, I am surprised to say that I was able to squeeze it out in less than two hours, lined bodice and all!
She got a cookie for this pose!
back tie
buttons to close shoulders, decorative bow at waist
Using her make-up brushes on her sister, my little budding make-up artist!

Tuesday, September 25, 2012

Wine-terest night (cheesy name alert!)

I mentioned my new idea for hanging out with my friends in a past post!  I am finally getting around to sharing the result of my first Wine-terest night!
Drink wine.  Make your pins.  It's simple!

My friend Aimee and I had not really hung out since we were pre-teens.  Our parents went to high school together so we grew up hanging out.  Well, after many Facebook comments and mutual pins on Pinterest, I was like....hey, I have an epiphany- LETS ACTUALLY HANG OUT!!!! hahah!!!  Technology is great, but it makes me lazy.  I've got people I talk to on Facebook that I hardly hang out with in "real" life!  To remedy that, I had the idea to keep an eye out for things a friend and I both pin, then setting a date to get together and actually make it and hang out.  Bonus points for wine and snacks :)
Here was the pin we both loved:

http://www.etsy.com/listing/81650613/autumn-fall-tulle-wreath-a-must-see?ref=sr_gallery_34&ga_search_submit=&ga_search_query=autumn&ga_view_type=gallery&ga_ship_to=US&ga_page=3&ga_search_type=handmade&ga_facet=handmade
  
It is an esty shop if you want to go buy one!  I pu the link under the photo for your convenience and to give credit where due.
Aimee and I had a great time catching up, and here is what we came up with!

On the left is Aimee's cute fluffy one, and on the right is my "stripey" one.  Both cute!
We decided they could double as lion's manes.
So get pinning, hang with your friends, and have a great time!!!

Thursday, September 20, 2012

Single Serve Shortbread recipe using Nectresse natural sweetener!

This is a Sponsored post written by me on behalf of NECTRESSE™Sweetener for SocialSpark. All opinions are 100% mine.

Nectresse product family.jpg

I have always been on the hunt for a natural no calorie sugar replacer, and I think I have found my favorite so far!  NECTRESSE™ is a 100% natural sweetener and its the only one made from fruit- monk fruit extract.  I also love that you can grab it at your local store, no need for a special trip to the health food store!

NECTRESSE™Sweetener

I decided to put it to the test in a few ways.  First, I tried some in my morning coffee- and it passed with flying colors!

Then I sent a sample to my Dad, who has type 2 diabetes.  He tried it this morning and liked that it didn't have a funny aftertaste like a lot of other no calorie sweeteners.  I guess I know I will be using NECTRESSE™ to make him a treat for Thanksgiving!

The final test was to try it in one of my favorite sweets recipes- this is the BIG test for a sweetener because of baking.  So I went for an all-time favorite, SHORTBREAD!!!  I decided to make a single-serving portion recipe for those of you like me who are watching our calories.  No leftovers to nibble on!  Of course, the NECTRESSE™ makes it much lower calories too!

Single Serving Whole Wheat NECTRESSE™ Shortbread

Preheat oven to 300 degrees F


Ingredients:

cousins 056

-2 tablespoons organic butter, chilled

-4 tablespoons organic whole wheat flour

-5 packets (1 tablespoon) NECTRESSE™


cousins 060

Step One:

Place ingredients in a small food processor (I have a small manual one that I love!)  Process until butter is rice-sized.

cousins 067

Step Two:

Use your hands to knead into a dough.

cousins 069

Step Three:

Shape if desired (I made mine a heart!)  Then prick with a fork.

Step Four:

Bake for 40 minutes.

cousins 072

Step Five:

EAT!!!  I broke mine in two to share with my husband, guess who took the bigger half???


So I guess you are wondering, did it pass my taste test?  YES!  In fact, I almost think I could cut back one of the packets because it has such a nice sweet flavor you can use less.  Want to taste for yourself?  SInce I can't come to all of your houses bearing NECTRESSE™ treats, you can get a free sample and try it for yourselves!  I'd love to hear what you make.

FREE sample of NECTRESSE™Sweetener

sweetener


Still need more convincing?  The always fantastic Lisa Ling loves NECTRESSE™!  Check out this video of her telling you what she thinks.

I'm going to grab the canister next time I'm at my local grocery store so I can save the packets I have left for my coffee and use the canister for baking.  So glad to have had the opportunity to try out NECTRESSE™ since I hadn't heard about it yet!

Have a great day!

Visit Sponsor's Site

Wednesday, September 19, 2012

What I've been up to...

Hi!  I have been enjoying my blog break but I definitely miss it!  It seems that even with #1 in preschool 2 days a week I am still not caught up enough to blog much.  BUT I am also really spending time with my family and keeping my priorities right, so that feels good.  I can always blog a lot more when they are older.

Stella's first time on the swing!
We discovered that Daddy had a cameo in Madagascar!
We've had lots of quality "cousin time".


Things I would have blogged about if I had time-
-I had a toddler busy bag exchange!!!
-I hosted a Pampered Chef party and earned some free stuff! (turns out my friends didn't mind Pampered Chef, they liked it!  I hate these kinds of parties normally)
-I created a fantastic butternut squash tart with caramelized onions, sage, and goat cheese.  Hopefully I can take pics next time I make it and share it here.

And am upcoming post....Wine-terest night with a friend!  I am having my first Wine-terest night which is....when a friend and I pin the same craft, I invite them over to drink wine and actually MAKE the thing we pinned!  hahahah!!! We are making a cute Fall tulle wreath. 

Wednesday, August 29, 2012

Garage Sale/Consignment tips!!!

So, lately I have discovered online garage sales- its like Craigslist, only more local!  There are these pages on Facebook with special interests- for example, baby and kids items, car parts, etc.  Some are more general.  Lately I have scored the following:
5 pairs of Children's Place jeans for $10
20 brand name kids items for $20 (shirts, jackets, pants, etc.)
A bag of toddler clothes (5 pants, a dress, several shirts), all brand name plus a reversible pink wool coat for $35

SCORE!!!  So my almost-3-year old is set for Fall very cheap!  And this is gently used stuff, some looks brand new.  I have also sold some things and gotten a lot more for them than I would have at a traditional garage sale.  One lady didn't even try to bargain with me and paid $20 for a toy!  Yup- $20!  And another lady bought some maternity clothes for me and paid $80.  Definitely more than I would have gotten at a resale shop., and cash in my pocket!

Moral of the story- if you have time, try out the Facebook garage sales!  You do have to arrange to meet up with people but so far I have had success.  Be smart about it, pick a very public place!

Now, onto consigning.  Everyone knows the shops don't give you much and reject half you items.  I am participating in a big weekend consignment sale in a couple weeks and can't wait to see how I do.  I only get to keep 60% of what they sell it for, plus there is a lot of prep work- logging items into a computer program, printing and attaching tags, hanging things "just so" on a wire hanger....I am skeptical but we'll see if its worth it.  I will let you know!

DO you have any garage sale-ing or consignment tips to share?  Please comment below!

Also- LJ starts preschool this week so you will probably be seeing more posts out of me soon!!!

Sunday, August 12, 2012

I'm Still here...

I'm still here, but I haven't been blogging lately.  It seems with two kids it has been a lot more work than it used to be, and I really want it to be fun!  So you will still see posts from me every now and then when I finish a project that I remember/have time to photograph, but I am not going to do all the linky parties and all those blogging things that seem to take a lot of time. 
I think once they are both in school more I will have time to actually take it seriously again!
Thanks for being interested in my projects and for reading :)
Catherine

Wednesday, July 18, 2012

Tomato Season! 10 ideas for tomatoes.

I definitely LOVE a good tomato, who doesn't?  (Okay, I know there are some non-tomato lovers out there but I'm not one of them.)
The best tomato is, in my opinion, one grown in my parent's backyard garden.  These are the tomatoes I grew up eating and they were sweet, and warm, and sometimes ripened on my mom's kitchen windowsill.
Imagine my horror when after purchasing our home, my husband and I discovered that we had no sun anywhere!!!  No garden!!!  I can grow shade plants only.  There is a tiny bit of sun the peeks through our mature trees every now and then so I tried to grow tomatoes in buckets in a wheelbarrow that I would wheel into the sun throughout the day.  Needless to say, it didn't work for several reasons!  So now I am at the mercy of my relatives and friends who have sunny yards (shout-out to Jill for the grape tomatoes I photographed above, then ate!)
Even without an overabundance of my own tomatoes, I know that those with gardens sometimes have more than they can handle.  So ideas 1-10 are "send them to me"...just kidding (kinda).
I linked to sources where necessary!

1. Make your own salsa and give it as gifts.  Can it!  Here is a canning-safe recipe from Ball.  I try to follow canning recipes pretty closely for safety reasons.  This would make a great little gift with some homemade tortillas, dried peppers from your garden, and homemade taco seasoning. (Mix salt, chili powder, garlic powder, cumin, and red pepper to taste).

2.  Caprese salad.  A favorite at my house!  Have you seen all the variations on Pinterest lately?  I love the one where you use a toothpick and thread the basil, a cherry tomato, and a tiny mozzarella ball on it.  Drizzle with olive oil, quality balsamic, and a bit of salt and pepper.  For a traditional version, use a larger tomato cut into slices, large ball of mozzarella slices, basil leaves (I roll them and smash a little to get the flavors out!) then drizzle with the same stuff.

3.  Homemade pasta sauce.  This is easier than it sounds.  It works best of you peel the tomatoes (cut out stem, cut an x in the bottom, drop in boiling water then pull out immediately and plunge in ice water).  Then simmer the tomatoes, olive oil, wine, herbs, garlic, and some tomato paste.  There are ENDLESS variations, that's why no recipe.  Perhaps I will actually measure my recipe out next time but I make it different every time based on what I have on-hand!

4.  Juice them- Have you ever juiced tomatoes?  My mom used to juice hers and can the juice to use in soups.  I would probably go more for a nice fresh Bloody Mary at brunch though :)

5.  Use them to dye fabric!  Here is an ehow article on dying things with natural objects.  I have heard of brightening red hair with tomatoes too, but my hair isn't red so I didn't try it, haha!

6.  Tomato sandwich.  I feel like this is a Midwest thing?  Let me know if you are outside the Midwest and eat these too.  It's just tomato, salt, pepper, and mayo on bread.  You could also get wild and make a nice BLT.  I would use some locally produced bacon, yummy!

7.  Roasted cherry or grape tomatoes.  This is a great side dish!  Simply toss with olive oil and fresh minced garlic and roast in the oven at 400 degrees F until they burst.  Salt to taste.

8.  Healthy lunch- slice up a big ripe tomato and top with cottage cheese.  I think I could eat this every day.

9.  Pizza Margherita- Make some pizza dough, pre-bake it a bit, then top with tomato slices, basil leaves, fresh minced garlic, and drizzle with olive oil.  Then place some tiny mozzarella balls on top and bake!

10.  Tomato facial- Tomatoes are high in antioxidants, and they are acidic!  So rub one into your face, let it soak in for bit, then rinse off.  This will make your skin nice and glow-y and should help with minimizing pores!  (If you have sensitive skin you might want to test a tiny amount first!)

I hope I helped you put all those yummy tomatoes to good use!  Share your favorite tomato recipes below!
 

Wednesday, July 11, 2012

How-To...make a toddler behavior chart


I have a two and a half year old and an almost five month old.  They keep me BUSY and on my toes!  We had been having some behavior issues out of our toddler, and time-outs just weren't cutting it.  That's when I decided that positive reinforcement is the key!   A pat on the back, a hug, encouraging words- those are all positive reinforcement.  However, we needed more!  Enter, the sticker chart.  Here are some tips for you if you want to make one as well.

CONTENT OF CHART
  • To make your sticker chart appropriate for your child, you first need to determine what you WANT them to be doing (not what you don't want them to be doing).  It should be attainable- for example, I didn't put on there that my 2 year old should be loading her own dishes in the dishwasher!
  • The older the child, the more items you can add.  Keep it super simple for under 2, maybe three categories.  For my 2.5 year old I have 7 which is borderline too many!
  • Some sample categories on mine:  Use the potty, Play nicely with Stella (her sister), Obey Mommy and Daddy the first time, Clean up some toys, Share something, Be polite, Wake up in your own bed.
Place it in the location you spend the most time in!

USE OF CHART
  • If you notice my categories above you will notice the category "Be polite".  This was my catch-all category, so I give her a sticker for that one if I notice anything positive that she does that isn't on the list.  So if she does something kind for someone (pick up something they dropped, help someone on her own, comfort someone who is sad, etc.) I give her a sticker here.  It is also for the obvious-saying please and thank-you, and asking nicely for something.  You want to be sure you reinforce all positive behavior!
  • Do NOT "set them up".  This is for when they genuinely do something on their own.  For example, don't put pressure on them by saying "you have to clean up your toys or I won't give you a sticker."  Can you see how this makes the chart a negative thing kinda?  
  • Do NOT take stickers away.  If she earns a sticker for playing nicely and gently with her baby sister, but five minutes later throws something at her, I don't take away the sticker.  She earned it fair and square! 
  • Anytime I see her do something on the chart, she gets a sticker.  If we are out and about, I keep track of them and she gets to put them on when she gets home- this is so exciting for her!
My lovely drawings!  Check out the awesome beard I drew on my hubby :)

SET-UP OF CHART
  • I put her name at the top "Lola Jane's Chart!" 
  • I used a ruler to make boxes, in this case seven down and four across.
  • Write in a simple sentence the category, and draw a picture if they can't read.  You will notice that my artwork is not spectacular, but its enough to help her know what is what.  If you REALLY can't draw at all, print off some clip art that you find online or cut pictures out of a magazine.
  •  I wrote the numbers one through six in each box.  A sticker will go on each number as she earns them.
30 cent prizes from Target!!!  Love when they do 70% off!

REWARDS
  • For a younger child, you should keep the rewards simple and fast to earn.  For the very young, the sticker itself is sometimes the only prize needed!  As they get older, move to three stickers equals a prize.  For LJ, she has to earn six in a category to get a prize.  You might decide to do a total number for the day, but I go by category.  So if she gets 6 stickers in the "Play nicely with Stella" category, she gets a prize.
  • Does your kid bug you for stuff at the grocery store, the department store...everywhere you go?  Well if it is in your price range, make the answer "Okay, we will buy this to put in your prize box".  LJ earned a pair of swimming goggles really fast one day because of this!
  • Keep an eye on Dollar General clearance, Target dollar section clearance and the like.  I just got her about 15 things that she will love from the Target dollar section for 30 cents each because they had it all marked 70% off.
  • Put in "coupons" for things they would want.  Maybe its staying up an extra ten minutes, a special outing with just mommy or just daddy, or TV time. 
  • I stay away from using any type of food or candy as a reward.  I read an article about this possibly contributing to eating disorders or bad eating habits and it made sense to me.  This is a personal opinion, obviously you can do as you choose! 
  • This doesn't need to cost a bunch of money (or any if you do the coupon idea) nor should it.  The point isn't to get them addicted to earning stuff. 
  • When the ENTIRE chart is finished, have a family celebration!  A trip to the bowling alley, Build-A-Bear, or the Zoo would be a fun way to celebrate.  Then its up to you if you need another chart or if their good habits are engrained enough to not need one!
Mommy's reward- my babies getting along and smiling!!!

I hope this helps you with your toddler!  Please comment below with your own category ideas or your own take on the sticker chart.  I know a lot of you have some great ideas for something like this! :)

Saturday, July 7, 2012

Simple Summer Dress

This year for the Fourth of July, I decided to make matching dresses for the girls to wear.  I wanted something simple- but not as simple as a pillowcase dress.  SO...I opted for a ribbed knit bodice and a gathered skirt.  Add a couple of straps, yoyo's, buttons, and a decorative hem stitch and it looks waaaaay more time consuming than it was in reality (my favorite kinds of projects!)

Step One- Cut a rectangle of your rib knit and hem the top (1/2"). Measurements should be the length you need plus one inch, then the width you need minus one inch (so it stretches tight to fit and won't fall down!)

Step Two- Cut a rectangle for the skirt.  Measurements should be the length you need plus one inch, and the width you need x4 for a nice full ruffle.

Step three- Hem the bottom of the skirt 1/2".  I used a decorative stitch that reminded me of fireworks!

Step Four- gather the top of the skirt.  Gather it so that it is several inches wider than the bodice.

Step Five- Attach bodice and skirt.  Find the middle of the bodice and pin to the middle of the skirt.  Then pin the edges.  Then find the middles and pin again.  You will stretch the bodice as you sew so that it matches up with the skirt.  Be sure to use a zigzag or other "stretch" stitch on your machine.

Step Six- Match up bottom hem, waist hem, and top and sew top to bottom- voila, a dress!  Now for straps.

Step Seven- Cut a long strip from your knit fabric- the ribs should be vertical if you lay the strap down horizontally.  Pull it, stretch it, work it!  Do this until it curls up like this photo:
Step Eight-  Cut two straps and attach.  Try the dress on your kid so you know where to place them.  Don't skip this- the knit can trick you!  I made mine halter style, but you could attach on the back also- or criss cross them.

Step Nine- Make two yoyo's and sew to cover where you attached straps.  Sew buttons onto the center of the yoyo's.  If you don't know how to make one, just google it, there are a million tutorials!

That's it!  Check out my adorable models enjoying theirs this week!

Lemonade is a must on a hot day!
happiest. baby. ever.
"Can I have my sucker now? Please Mommy, no more pictures."
If you make one in a different color scheme, let me know!  I love seeing pics!  I sure plan to make more :)

Are you a follower yet?  Please join me!  And spread the word!!!