Showing posts with label tutorials. Show all posts

Saturday, May 12, 2012

I-Spy Tutorial is Here!!!


It's here!  This really is an EASY project, but I just haven't had time in my sewing room until today.  I also started a really adorable sun suit for Stella using some light blue eyelet and vintage cotton eyelet trim for the ruffles.  It is going to be sooooo cute!
But back to I-Spy bags...these are great for kids who need to work on fine motor skills, memory, learning colors and shapes, etc.  If your child is on the Autism spectrum (as the recipient of this bag is) then you will want to make a few of these!  They would be a great teacher gift for your child's special ed teacher too- make a couple and tie them up with a spa gift card.  Teachers need that! (I know, I used to be one!)

You will need:
-2 fabric scraps, about 8"x8"
-a Clear plastic scrap (needs to be thick and durable- I cut up a bag that some sheets came in, you know the heavy plastic kind with a zipper?)
-Rice, beans or plastic fillers
-Tiny objects to fit inside (Try the craft store, tiny dollhouse pieces, bead shops have cute things too)
-Sewing stuff (machine, thread)
-Scotch tape (the satin finish kind)
-A camera
-A computer and printer
-Contact paper (or a trip to the office store to laminate)

Let's get started, shall we?

Step One:
Gather up your tiny items and photograph each one individually.  Here is a sample of what is in this bag.
Step Two:
Use the individual photos to make a composite and label each item.  I used the free online photo editor "fotoflexer" in collage mode to make this!
Step Three:
Print out the composite, and cover with contact paper or laminate.  This page will be kept with the I-Spy bag.  You can attach it to the bag with double sided velcro, a metal ring, etc.  Whatever you prefer.

Step Four:
Cut out two squares, about 8"x8".
Step Five:
Fold one square over, about 1/3 of the way.  Then cut a window out!

Step Six:
Cut out a plastic window slightly larger than the fabric window.
Step Seven:
Cut out any appliques you want to use to decorate the bag.  I made some eye pieces with a button for the eyeball.  The stripes will top the black part.
Step Eight:
Place a piece of the Scotch satin tape on your presser foot.  This will make it slide effortlessly over the plastic.  (Do this anytime you sew on plastic, laminated fabric, oilcloth, etc.)
Step Nine:

Using an applique stitch of your choice, attach the plastic window.  I set my stitches close together so I didn't need to hem the window first.  Yay for saving time!
Step Ten:
Apply your design item, in my case the Eye for I-spy!

Step Eleven:
With right sides facing, sew the two squares together leaving an opening to turn/stuff.  Clip corners!  (No picture, I know you got this, right!?!?!)

Step Twelve:
Stuff with rice (or whatever you chose to use) and the tiny items.  Leave space for the top stitching!

Step Thirteen:
Top stitch once on the very edge to close the hole.  Then go in about 3/4" and do it again!  You will need to move the rice around carefully so you don't stitch over it!

All done!  Enjoy!!!

Wednesday, May 2, 2012

Spring-y Decorated Sugar Cookies


I LOVE making my "special cookies" which is really just cut-out sugar cookies that are decorated (that's the special part!)
With LJ's preschool carnival coming up, I knew I wanted to contribute something for the cake walk!  Since I needed to drop it off a few days beforehand, I went with these cookies.
Check out the best recipes and tips all in one place- the blog Glorious Treats.  If you don't follow her blog you are missing out on some great ideas for parties, cakes, and of course, cookies!
I used to use a different recipe but now I use hers and it turns out great every time.
Step One: Don cure apron and no make-up.  (Okay, the no make-up part is just on there as a disclaimer!)
Step Two: Make dough, chill, roll out, then choose a couple of flower cookie cutters and go to town.  I know, I know, that is a million steps.  HINT: Roll out your dough on top of a flour-cloth towel that you have rubbed flour into.  It will NEVER stick, and it won't add a bunch of flour to your yummy dough!
Step Three:  Bake em'.  HINT:  Cool your sheets in between batches by throwing them in the freezer for a minute!  This will keep it from melting your dough too soon.
Step Four:  Make some Royal Icing and separate it into batches for different colors.  I used the green, yellow, and pink as-is, then mixed pink and blue for purple too.  These are the Wilton gels and they worked great.  HINT: I take a ziploc, put the interior plastic part for the frosting coupler in the corner, but DO NOT snip corner off yet.  Then you can fill with the frosting and seal so it doesn't dry out while you are doing the other colors!  You will need to snip the corner before you frost, obviously!  Use the freezer bag ones or your bag might split.


For my daisies, I did the petals first,then made a spiral of contrasting icing in the center.  Then I added a dot of green.
For my tulips, I decided to get a little crazy and make a floral scene.  I did the grass outline first, then flooded, then did the flowers, then the stem/leaves, and finally, the dots in the center in contrasting icing.
And to make everything look better, fancy packaging!  I got three of these cupcake boxes for $3.50 at TJ Maxx.  They are the "Meri" brand if you want to try to find some.  They are perfect for cupcakes, but worked fine for the cookies too!

I hope this inspired you to get baking!  I hadn't done this in a while and it was fun, I have missed it!  My house was a mess after because I let my 2 year old run wild.  Otherwise, I wouldn't have gotten the cookies done!

I am working on the i-spy tutorial!  I went to Hobby Lobby yesterday and spent waaaaaay too much money buying miniature things to put in them. So excited to get the first one done!

Sunday, February 26, 2012

Healthy and Yummy Smoothie Recipe

I love smoothies- they are an easy and tasty way to squeeze in some extra nutrition.  The best part is, I make mine different every time based on the ingredients I have available.  This gives my body some variety vitamin-wise, and helps me use up stuff in my fridge!
mmmm, frothy!

Now, I know the green color might turn you off a bit.  It is kinda weird!  But I promise you it doesn't TASTE green :)  When LJ drinks it she calls it ice cream!

So what do you put in a smoothie?

A MILK
This can be cow's milk, goat milk, soy milk, almond milk...whatever you fancy.  You could even do some yogurt.
A GREEN OR TWO
The best "starter" green is raw spinach since you probably already eat that sometimes.  I like to use kale.  Today I used a purple kale but it still looks green when all ground up.  Using a variety of greens can give you a lot of healthy, fresh vitamins!
OTHER VEGGIES??? 
Carrots are always good because they are sweet.  Don't add any spicy veggies or it will not taste good!
SOME FRUIT
The fruit really makes it taste good and sweet.  I like bananas because they make it smoother and creamier.  I also added an apple today.  Pineapple is really yummy in a smoothie if you have one.
SWEETENER???
This is up to you.  A bit of honey or maple syrup can add the right touch if you just don't think its sweet enough.
EXTRA FLAVORS
Vanilla extract (the real stuff), cinnamon, fresh grated ginger...use your imagination/mood to guide you!
PROTEIN
If you need extra protein in your diet or are using this as a meal, I would suggest adding some protein powder or plain silken tofu.  If you want to be a little indulgent, try the chocolate or vanilla silken tofu.  It is a liquid-y tofu that is like a dessert! Or you could add a nut butter- if you do this I would stick to fruits that you think taste good with peanut butter.  For example, I would not do a kiwi with it!

Some of my ingredients for today!
Be sure to wash all of your ingredients well, since you will be eating this raw.  It is also a good idea to use organic whenever possible.  We are lucky to have a lot of organic produce available where we live.  I even use a home delivery service that actually SAVES me money!  (Green B.E.A.N. Delivery)  Check them out- they are slowly expanding over the Midwest if you are in the area. (I am not spokesperson, just a fan!)

Throw in some ice cubes and blend on the highest setting of your blender until smooth and frothy.  You can keep the extra in your fridge to drink throughout the day, but be sure to give it a good stir first.  I personally don't keep mine overnight, I think it should be eaten the day of.

Enjoy your smoothies and comment below if you come up with any awesome combos that I should try!

Remember to please become a follower so I can reach my next goal and do another GIVEAWAY!!!

Wednesday, February 22, 2012

FREE pattern- crochet baby turban


So, the idea for this pattern started with Pinterest.  I'll take a moment to vent here....don't you HATE it when you want to pin something, and it goes to flickr instead of the original page?  Or you click thinking its DIY and its a shop?  Or you click and its in another language?  Well, this one was in another language, so I attempted to have Google translate it.  I was so bummed to see that it was knitting, because I am not big on knitting, nor am I very good/fast at it.  So I decided to simply use it as inspiration to create my own crochet pattern.
(And PLEASE, if you pin something, check first to make sure its from the original source so us bloggers/creators get credit for our hard work!)
So here is the picture- can you blame me for wanting to pin this?  What a cutie!!!!  (The hat and the baby!)  It is from a blog called Pickles.
credit here
You can see that mine is not completely the same, and that's okay- I don't want to completely copy it, just recreate the "feel" of that adorable little turban!  I've had this done for a while but had to wait for my model to be born :)

Crocheted "Stella" Turban (NB-3 months)

Size H crochet hook
1 skein cotton yarn (I used Sugar N' Cream)
abbreviations: sc (single crochet), sl st (slip stitch), hdc (half double crochet)

Round 1: Make 6sc in a Magic Ring (click through to link to get the how-to), pull string to close hole.
Round 2: Make 2 sc in each stitch around and join with sl st. (12)
Round 3: (2sc, 1sc) all around and join with sl st. (20)
Round 4: (2sc, 1sc, 1sc) all around and join with sl st. (27)
Rounds 5-6: (2sc, 1sc, 1sc, 1sc) all around and join with sl st. (34, 43)
Rounds 7-11: sc all around , join with sl st. (43)
Round 12: hdc all around, join with sl st. (43)
Round 13: sc all around, join with sl st. (43)
Round 14: hdc all around, join with sl st. (43)
Round 15: sc all around, join with sl st. (43)
Round 16: hdc all around, join with sl st. (43)
Round 17: turn and sl st all around.  Weave in ends.
Finishing:  Count up 7 rows and insert a piece of yarn.  Tie up from last row to form front of turban.  Cinch tightly!  Wrap ends around tightly and tie again (tie knot on inside).  Weave in ends.  Cut 3 pieces of yarn about 7" long.  Insert through loop on front and tie a bow tightly.  Double knot and trim ends of bow.

She slept almost three hours wearing this...maybe it will keep your little one cozy and sleepy too?   5 days old today!

That's it!  If you make one please link to it below so I can see :)
Remember, this is for personal use only!

Are you a follower yet?  Join me via linky, RSS, email, or FB!  Google is getting rid of friend connect soon, so I am trying to get followers to move to one of the above methods!

When I reach my current followers goal I will do another giveaway!!!

Thursday, February 16, 2012

Wildflowers Baby Mobile Tutorial

It's almost time for this baby and as I've told you I have been a BUSY bee making projects for her!  One project that I finished this week is the Wildflowers Baby Mobile.  It turned out even cuter than what I had envisioned! (Love when that happens!)
I think this could even be used in places other than a nursery.  It is so whimsical and romantic, girlie and unique!  So even if you don't have a need for this in a nursery, you could add some white Christmas lights and use it as a little chandelier, etc.  Let me know if you come up for another use for this project!

So, you want to make one? Let's get started!

Gather your materials!
Materials Needed:
-One long flexible floral stem with leaves/branches
-2-4 floral stems with several flowers each in the color scheme of your choice (this is up to your creativity- you can use as many flower types, colors, etc. as you choose!)
-Floral tape, wire, or "vine" (I used the faux flexible vine stuff)
-Clear elastic jewelry thread (use a thick gauge for durability!)
-Hot glue gun and hot glue sticks
-Tiny metal hook for hanging

Step One-
Take the long leafy/branchy stem and wind it into a circle.  Mine is about 12" in diameter but make it the size you think looks best for your space. 
I bent some of the leaves the opposite direction so they were all over.
Step 2-
Use your floral tape or vine and wrap it around to firmly attach the ends.  Be sure that the circle will not be coming apart!
See how nice the vine wire blends in?
Step 3-
Prepare your flowers.  Pop off some individual flowers and some groups of flowers (it might depend on the types you bought).  The point is to try and get some variety in how they are grouped.  Use the glue gun to be sure all the flower parts are reinforced.  Faux flowers can pop off into tiny pieces that could be a choking hazard so this step is VERY important both for durability and safety.  It takes some time, but is well worth it!
Gluing base on securely.
Step 4-
Decorate the circle with flowers from all angles- you want the mobile to look pretty from the baby's view, not the top!  The sides should be pretty too since you will see that in the room...but mainly keep in mind the baby's view.  Try not to follow a regular pattern, this needs to be very organic looking!
Don't be shy with the glue!  Have fun arranging your flowers in random places.
Step 5-
Begin attaching the hanging parts.  I put a drop of hot glue on the end of the clear elastic thread, then inserted it into the hole at the base of the flowers.  Some of the blue ones in clumps didn't have a hole, so I glued the thread to the side (about 3/4" of it for durability).  Vary the lengths of the thread so the flowers hang randomly!
See how nicely the elastic thread fits in the base of the flower?
Step 6-
Tie the elastic threads to the circle and glue well.  Again, you don't want this to be too uniform- space them out differently and be sure that there are a variety of flowers- colors, single flowers, bunches of flowers, etc.  It's best to lay them out ahead of time to plan.
Glue the knot, but be careful not to melt through the plastic!  These knots will not hold well without the glue.
Step 7-
After all of your flowers are attached the way you like it, attach four equal lengths of the elastic thread to the top of the circle and knot at the top.  Then screw a hook into the ceiling and hang the mobile on the hook!
Mine is not above the crib yet- waiting on my Dad to bring the hook over!
Some ideas for variations-
-Use a floral stem for the circle and hang lightweight birds or butterflies from the elastic thread!
-Make one that is all leaves.
-For a boy, it would be cute to use leaves and hang some lightweight plastic lizards, caterpillars, etc.
The sky is the limit to your creativity!!!
Let me know if you try it and post a link below so I can see it!

Please remember that this tutorial is for personal use only.  If you pin to Pinterest, please use the top photo with my website watermark on it!  Thanks so much!

***Are you a follower yet?  When I reach my current goal I will do a GIVEAWAY!!!***  Google is getting rid of Friend Connect this Spring, so please follow via RSS, Facebook, Linky, or email if you don't mind :)

Tuesday, February 14, 2012

Just to keep you posted...

You all know that I am VERY pregnant right now- and this baby is going to come any time!
I have been working on nursery projects and will have some fun things to share with you in the upcoming weeks- I'm going to spread it out a little.  Here is a little list of what's upcoming...

-Box pleat window valance tutorial
-Cloth diaper "wet bag" tutorial
-Wildflowers baby mobile tutorial
-2T and infant Easter dresses tutorial (and maybe a pattern...we'll see!)

I also have been using some other tutorials to make things, like this one from With a Tangled Skein for a crochet wool diaper cover, and this one from Sew Much Ado for a nursing cover.

Anyways...if you like newborn baby girl pictures keep your eye on my blog because there will be some soon!  I can't wait to see who she looks like, and what her little personality is like...I know my 2 year old has personality to spare, haha!

Sunday, February 12, 2012

Ladies Kimono Robe- A Tutorial!

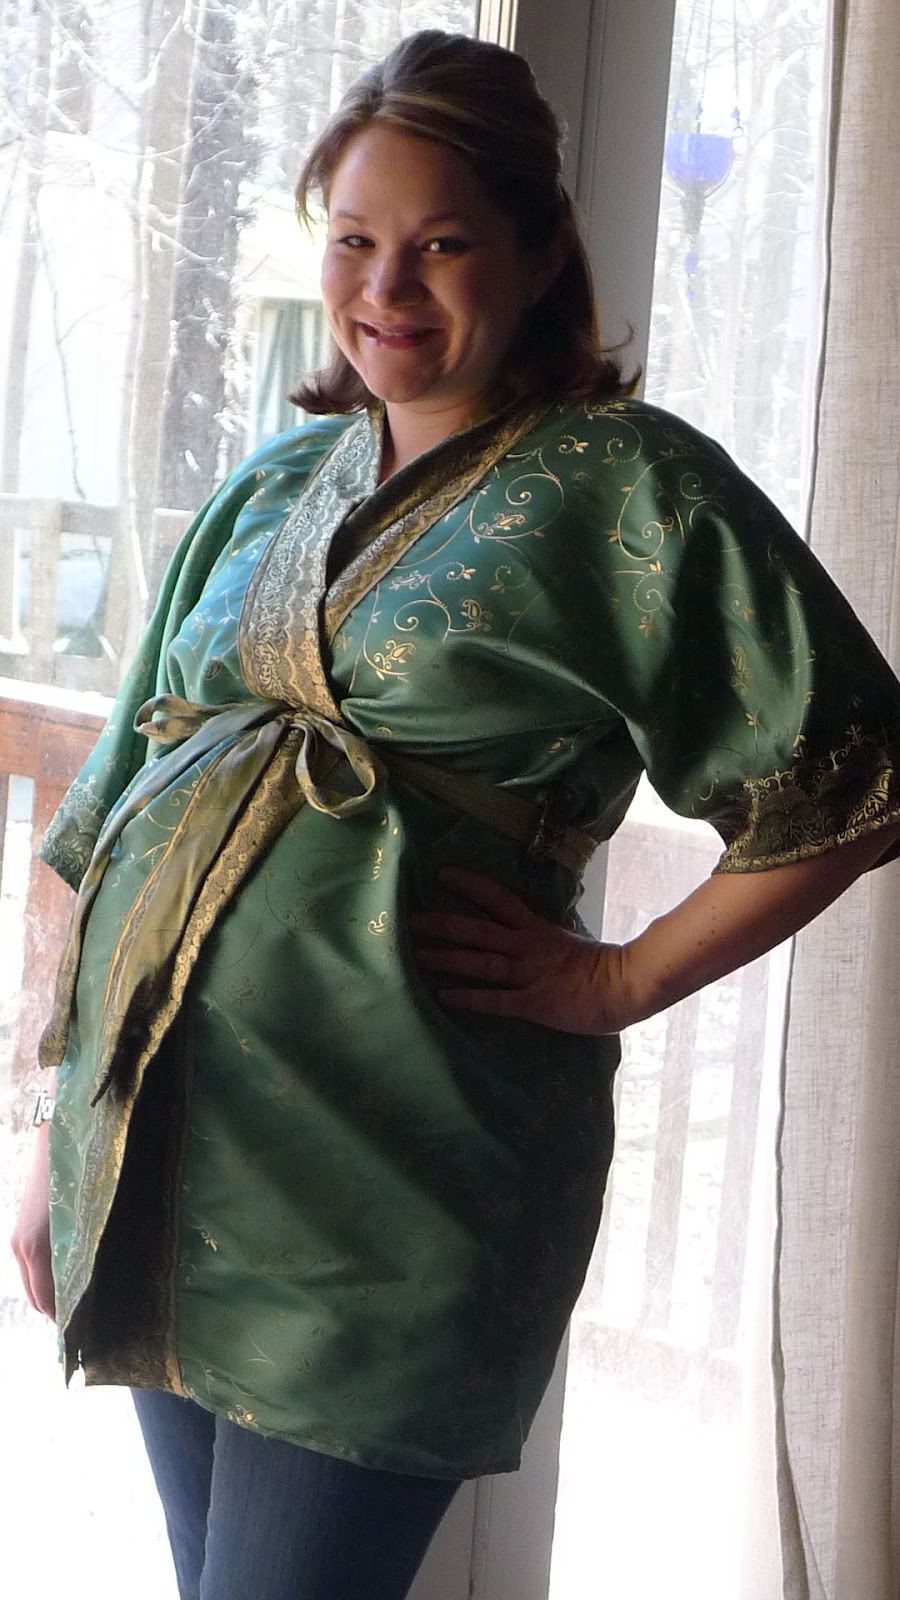
Guess what?  I actually sewed something for myself this week!  It turned out just as planned, I love when that happens!!!  So I am sharing the tutorial with you.  I searched a lot online and couldn't find any other free pattern or tutorial for a Kimono Robe, so I hope a lot of people find this who want one. (Please remember to link to me if you post about it!)  It is so comfy, and one size fits most!  (I would say realistically a size Small-Large as my 9mos prego belly is completely covered in it and I am normally a Medium.)  You could very easily make a longer version of this by buying more yardage and lengthening the inches in Step 1.
Please pretend my face isn't swollen to twice its normal size- I'm popping this baby out in about a week!
 
I made this to take to the hospital with me, as the maternity robes out there are less than stylish, and I wanted something unique!  While I did make this generous enough to fit a pregnant belly, it is not just for pregnant chicks- any woman (and some men, haha) would love to relax in a roomy, silky robe, right?!?!?!  The best part?  I got this beautiful fabric on sale at Hancock for only $2/yard!  So my whole robe cost about $5.

So, here is the tutorial...enjoy!  If you make one, please link up a photo below because I would love to see it!


ToBeContinued Ladies' Kimono Robe

Materials Needed:
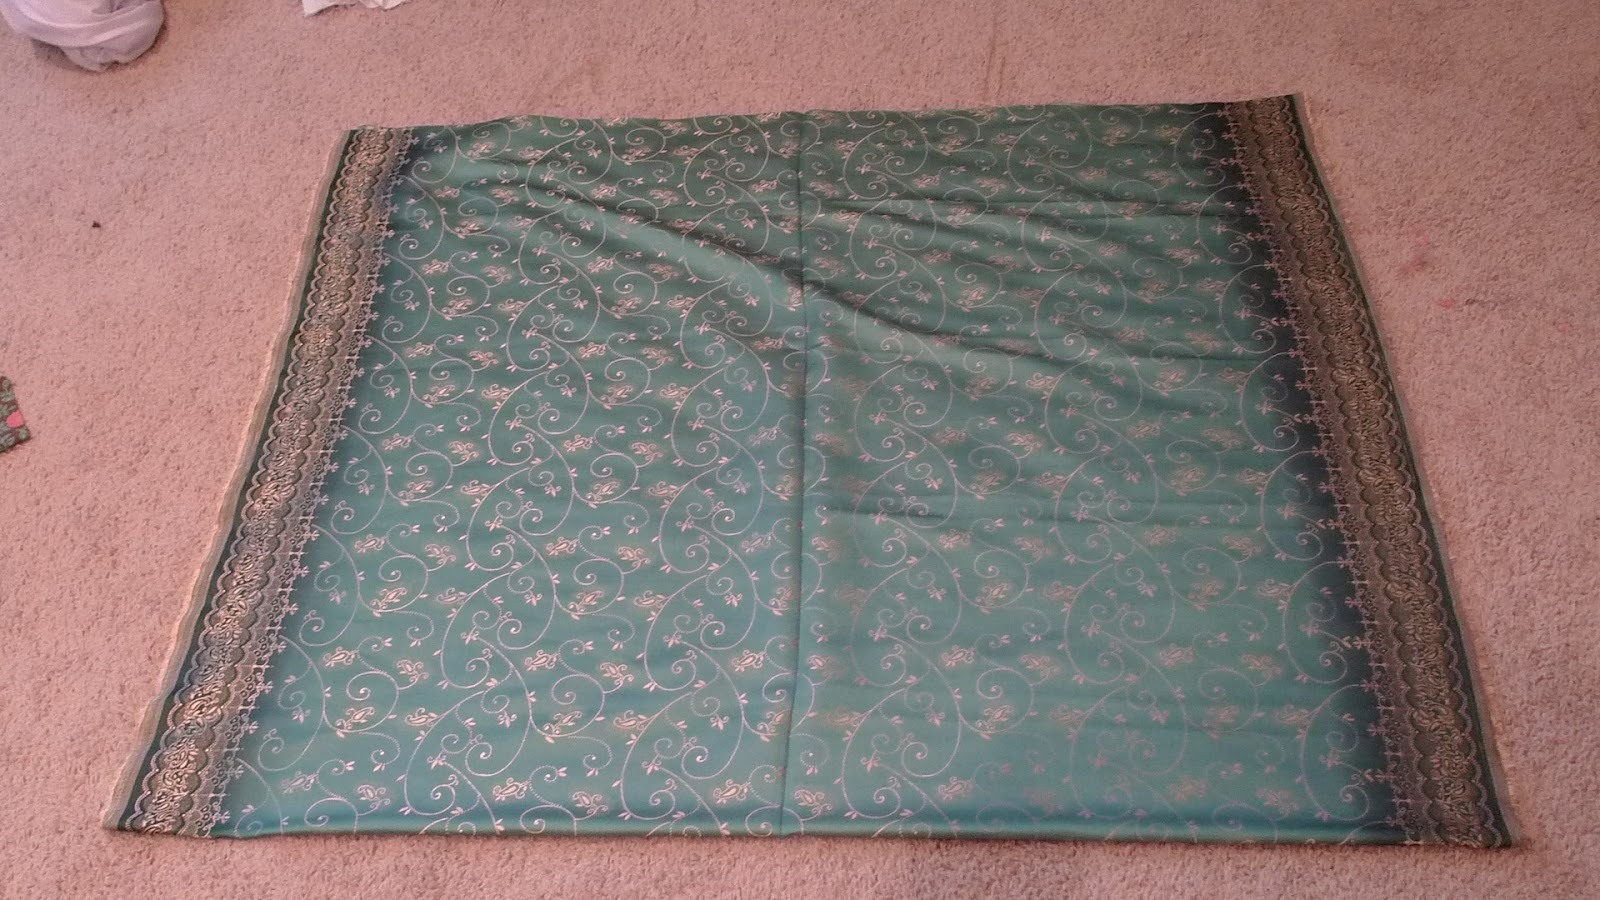
2 1/2 yards silky brocade fabric (44" wide)  (If you want a contrasting trim like mine, choose a fabric that has a pattern on the edges and is completely reversible.  Most brocades are.)
close-up of my fabric

Matching thread
Sewing machine, scissors, quilting ruler, and other sewing tools as needed.

Step One- Cut a length of fabric that is 74".
With slippery fabric like this, pin pin pin!  I also used fabric weights to hold it in place while cutting.  Rotary cutters work best for this type of long cut.
Step 2- Fold the fabric in half along the widest side and pin the edges together to prevent slipping.  I did this on the (thread/scrap covered) floor to give myself lots of room!
Hopefully yours has this handy crease down the middle from being on the bolt.  If not, you may want to iron one in to help with the next few steps!
Step 3- Cut the center and neck out.  Measure out 3" from either side of the crease and mark all the way to the bottom hem.  (In other words, 6" out of the center.) Then cut- this is for the TOP LAYER ONLY!
I used my hand-held Gingher shears for this since I needed to cut the top layer only.
Step 4- Cut out the neck.  Mark a very slight half-moon shape for the neck and cut.
Don't stress if it isn't perfect- you will be covering this with a very wide binding. (Can you see how wonky mine is, haha!)
Step 5- Mark sleeves and body.  I used a large quilting ruler for this- once again that fold going down the center will come in handy!  For the sleeve shape, measure 10" down from top fold (the shoulder/arm) and 15" out from the center crease.  Mark.  Then continue marking the 15" mark to the bottom hem. 
If you want an even wider sleeve, feel free to go 11" or 12" down.  I found that 10" was just right for me though.

Step 6- Carefully cut out the L-shaped marking.  It is looking like a Kimono already!!!  (SAVE YOUR SCRAPS- we will be using them!)
Getting there- I love when it actually starts to look like something!
Step 7- Pin the bottom side of the sleeve and down the sides.  Yes, we are pinning on the RIGHT side of the fabric- because a French Seam is a MUST with this kind of silky, stringy fabric.  (You certainly could use a serger, but it would be a little scratchy and you still could get a few loose strands.  Therefore, my seam allowances are for French seams).  Usa a lot of pins because this is slippery fabric!  Normally I like to pin horizontal to the seam, but to prevent slippage I find that vertical is better with this type of fabric.

Step 8- Sew a very scant 1/4" seam.  Curve carefully at the armpit.

Note how the fabric is inside the edge of the presser foot.
Step 9- Trim any stringy things hanging off and press the seam.  Then turn the robe inside out.

Step 10- Sew a generous 1/4" seam to be sure you have encased the raw edges.

Your gorgeous French Seam is taking shape!  No scratchy stuff against your skin, and no loose threads!

Et voila!  Tres jolie!
Step 11- Hem the arm holes and bottom.  Simply fold over 1/4" and press, then another 1/4" and tack down.  Sorry, no picture of this!

Step 12- Make the trim.  This part is cool, because you simply use the parts you cut out to make the arms and body.  You should have 4 identical pieces sitting there.  Simply sew them end to end!  I used the gold side of my fabric as the "right" side for the trim so it would have a pretty contrast to the robe.  It also utilizes that pretty pattern on the edges of the fabric!  You will need to iron it like bias tape- in half, then fold in each side about 3/4" (NOT all the way to the center crease as you would bias tape- we want to see that pretty pattern!)  This will be a little bit longer than what you need, but we will cut off the extra at the end.  For now, mitre in the corners and fold over one end.  Baste in place.
Step 13-  Pin on trim.  Pin very carefully!  I placed it so the raw edge of the robe was about 3/4" inside.  This makes it nice and stable when you attach it.  When pinning around the neck it will be a challenge to get it to lay flat, but do your best.
I used my quilting ruler again to be sure the trim was going on evenly as I pinned.
Step 14- Sew the trim on carefully.  I went nice and slow  to be sure it was going on smoothly- especially around the neck!  You may find that the trim stretches a bit as you go around and you need to adjust your pinning for the second side.  This is fine, and that is why we didn't cut the excess off yet!  Stop with about 3" to go on the bottom of the second side.
Stick as close to the edge as possible!  You can always go back on the "wrong" side and be sure you caught the edges there too.
Step 15- Finish off the bottom edges of the trim.  When you get to the bottom of the second side, you will have excess fabric.  Cut it off leaving about a 1" overhang.  Mitre the corners as before and fold under, then baste down.  You can then finish that last 3" that you left unsewn.  Sew along the very bottom edge of the trim, being sure both sides are lined up perfectly.  Do this for both sides.
Neat and tidy!
Step 16- Make the belt.  Cut two 3" wide strips running the entire width of the fabric (44").  Sew them end-to-end, making the color you want as the right side (I again used the gold for contrast).  Then sew a 1/4" seam down the length, reinforcing with a zig-zag stitch or serger.  Turn this tube inside out, press, then turn ends to the inside at a slight angle and press then stitch down.
The ends of the belt will be turned to the inside and sewn down.
Step 17- Make and attach the belt loops.  Cut a 2"x10" piece.  Turn it inside out and sew a 1/4" seam. (Make whatever side you want the right side- I wanted the green to blend the belt loops in).  Turn the tube inside out and press, then cut in half so you have two 5" pieces.  Turn the ends to the inside like you did with the belt ends- be sure both belt loops end up the same length after doing this!  Then put your robe on so you can figure out where you want your loops to be.  Mine are up a little high so it ties above my big baby belly, but not so high that it will be weird someday when my belly is flat again (can't wait!!!)  Pin in place at the center of the loop.  Measure to check that they are even.  Then fold under the edges about 1/4" and sew in place.  I went over it a couple times to be sure it was tacked down securely.
Be sure to measure and adjust as needed so your loops are even on both sides!
Last step!!! Yay!
 
Step 18- Try on your robe with belt, and admire your sexy self in a mirror.  You may want to iron out that crease down the back, but it will eventually go away.  Enjoy your comfy, silky, Kimono Robe!


Oh, yeah...so HOT! (No really, these hormones are making me sweat, haha!)

Remember that this is for personal use only (yourself, gifts, etc.)  Please contact me if you are interested in making these to sell and I can give you the pricing for commercial license based on quantity.


Are you a follower yet???  Google is getting rid of Friend Connect in a bit, so please follow via the new Linky, or use RSS or email.  You can also follow me on Facebook and Pinterest!