Guess what? I actually sewed something for myself this week! It turned out just as planned, I love when that happens!!! So I am sharing the tutorial with you. I searched a lot online and couldn't find any other free pattern or tutorial for a Kimono Robe, so I hope a lot of people find this who want one. (Please remember to link to me if you post about it!) It is so comfy, and one size fits most! (I would say realistically a size Small-Large as my 9mos prego belly is completely covered in it and I am normally a Medium.) You could very easily make a longer version of this by buying more yardage and lengthening the inches in Step 1.
 |
| Please pretend my face isn't swollen to twice its normal size- I'm popping this baby out in about a week! |
I made this to take to the hospital with me, as the maternity robes out there are less than stylish, and I wanted something unique! While I did make this generous enough to fit a pregnant belly, it is not just for pregnant chicks- any woman (and some men, haha) would love to relax in a roomy, silky robe, right?!?!?! The best part? I got this beautiful fabric on sale at Hancock for only $2/yard! So my whole robe cost about $5.
So, here is the tutorial...enjoy! If you make one, please link up a photo below because I would love to see it!
ToBeContinued Ladies' Kimono Robe
Materials Needed:
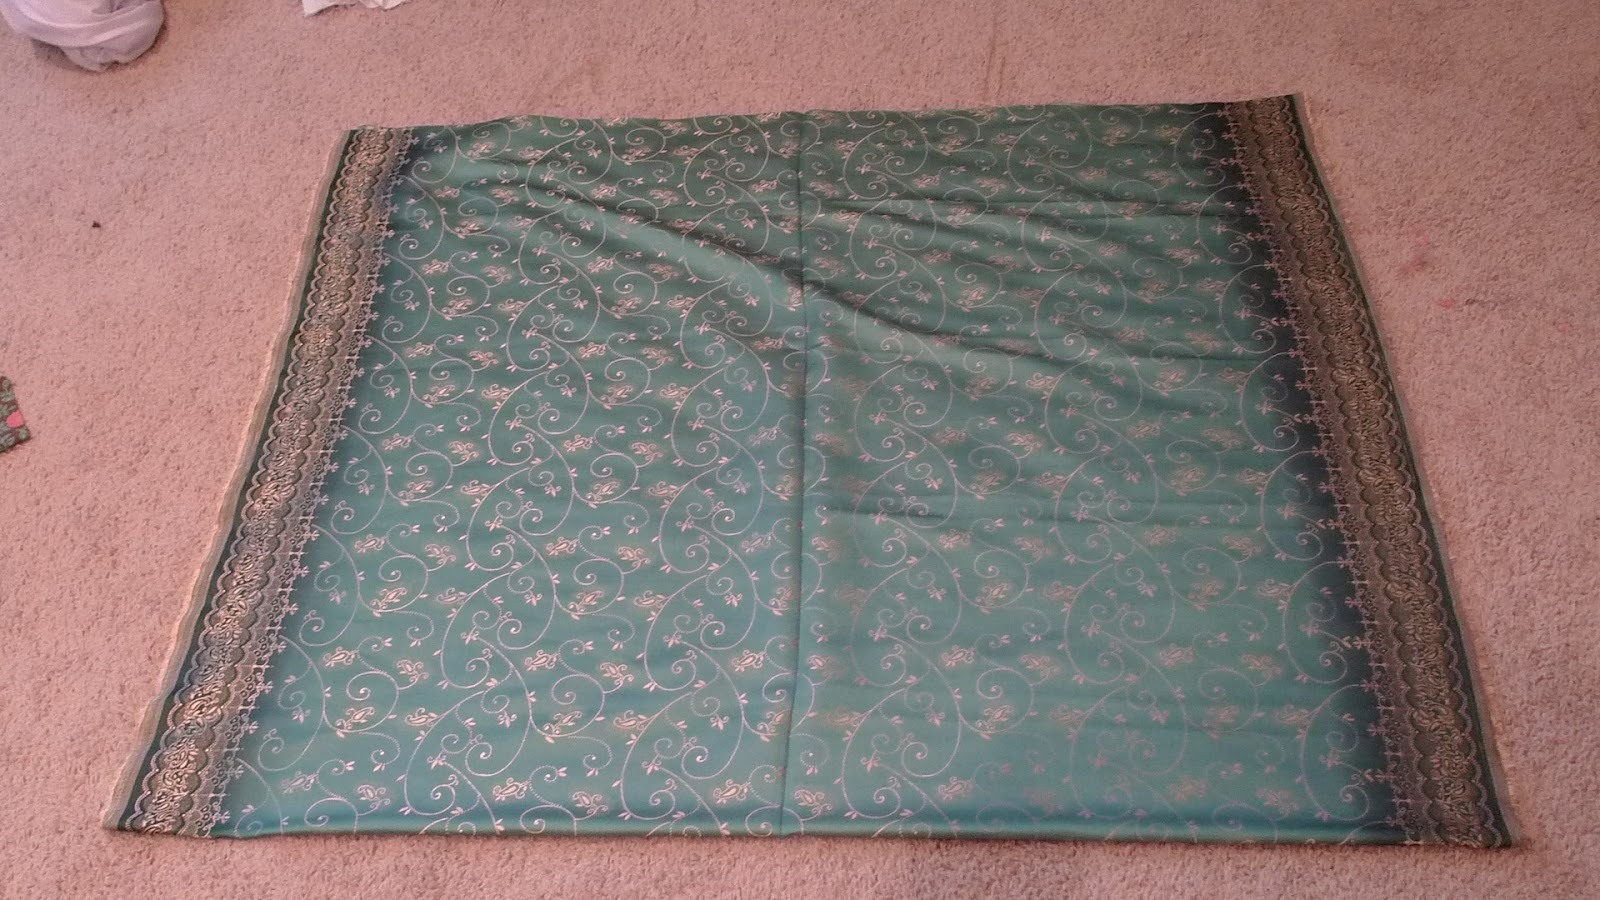
2 1/2 yards silky brocade fabric (44" wide) (If you want a contrasting trim like mine, choose a fabric that has a pattern on the edges and is completely reversible. Most brocades are.)
 |
| close-up of my fabric |
Matching thread
Sewing machine, scissors, quilting ruler, and other sewing tools as needed.
Step One- Cut a length of fabric that is 74".
 |
| With slippery fabric like this, pin pin pin! I also used fabric weights to hold it in place while cutting. Rotary cutters work best for this type of long cut. |
Step 2- Fold the fabric in half along the widest side and pin the edges together to prevent slipping. I did this on the (thread/scrap covered) floor to give myself lots of room!
 |
| Hopefully yours has this handy crease down the middle from being on the bolt. If not, you may want to iron one in to help with the next few steps! |
Step 3- Cut the center and neck out. Measure out 3" from either side of the crease and mark all the way to the bottom hem. (In other words, 6" out of the center.) Then cut- this is for the TOP LAYER ONLY!
 |
| I used my hand-held Gingher shears for this since I needed to cut the top layer only. |
|
Step 4- Cut out the neck. Mark a very slight half-moon shape for the neck and cut.
 |
| Don't stress if it isn't perfect- you will be covering this with a very wide binding. (Can you see how wonky mine is, haha!) |
Step 5- Mark sleeves and body. I used a large quilting ruler for this- once again that fold going down the center will come in handy! For the sleeve shape, measure 10" down from top fold (the shoulder/arm) and 15" out from the center crease. Mark. Then continue marking the 15" mark to the bottom hem.
 |
| If you want an even wider sleeve, feel free to go 11" or 12" down. I found that 10" was just right for me though. |
|
Step 6- Carefully cut out the L-shaped marking. It is looking like a Kimono already!!! (SAVE YOUR SCRAPS- we will be using them!)
 |
| Getting there- I love when it actually starts to look like something! |
Step 7- Pin the bottom side of the sleeve and down the sides. Yes, we are pinning on the RIGHT side of the fabric- because a French Seam is a MUST with this kind of silky, stringy fabric. (You certainly could use a serger, but it would be a little scratchy and you still could get a few loose strands. Therefore, my seam allowances are for French seams). Usa a lot of pins because this is slippery fabric! Normally I like to pin horizontal to the seam, but to prevent slippage I find that vertical is better with this type of fabric.
Step 8- Sew a very scant 1/4" seam. Curve carefully at the armpit.
 |
| Note how the fabric is inside the edge of the presser foot. |
Step 9- Trim any stringy things hanging off and press the seam. Then turn the robe inside out.
Step 10- Sew a generous 1/4" seam to be sure you have encased the raw edges.
 |
| Your gorgeous French Seam is taking shape! No scratchy stuff against your skin, and no loose threads! |
|
|
 |
| Et voila! Tres jolie! |
|
Step 11- Hem the arm holes and bottom. Simply fold over 1/4" and press, then another 1/4" and tack down. Sorry, no picture of this!
Step 12- Make the trim. This part is cool, because you simply use the parts you cut out to make the arms and body. You should have 4 identical pieces sitting there. Simply sew them end to end! I used the gold side of my fabric as the "right" side for the trim so it would have a pretty contrast to the robe. It also utilizes that pretty pattern on the edges of the fabric! You will need to iron it like bias tape- in half, then fold in each side about 3/4" (NOT all the way to the center crease as you would bias tape- we want to see that pretty pattern!) This will be a little bit longer than what you need, but we will cut off the extra at the end. For now, mitre in the corners and fold over one end. Baste in place.
Step 13- Pin on trim. Pin very carefully! I placed it so the raw edge of the robe was about 3/4" inside. This makes it nice and stable when you attach it. When pinning around the neck it will be a challenge to get it to lay flat, but do your best.
 |
| I used my quilting ruler again to be sure the trim was going on evenly as I pinned. |
Step 14- Sew the trim on carefully. I went nice and slow to be sure it was going on smoothly- especially around the neck! You may find that the trim stretches a bit as you go around and you need to adjust your pinning for the second side. This is fine, and that is why we didn't cut the excess off yet! Stop with about 3" to go on the bottom of the second side.
 |
| Stick as close to the edge as possible! You can always go back on the "wrong" side and be sure you caught the edges there too. |
Step 15- Finish off the bottom edges of the trim. When you get to the bottom of the second side, you will have excess fabric. Cut it off leaving about a 1" overhang. Mitre the corners as before and fold under, then baste down. You can then finish that last 3" that you left unsewn. Sew along the very bottom edge of the trim, being sure both sides are lined up perfectly. Do this for both sides.
 |
| Neat and tidy! |
Step 16- Make the belt. Cut two 3" wide strips running the entire width of the fabric (44"). Sew them end-to-end, making the color you want as the right side (I again used the gold for contrast). Then sew a 1/4" seam down the length, reinforcing with a zig-zag stitch or serger. Turn this tube inside out, press, then turn ends to the inside at a slight angle and press then stitch down.
 |
| The ends of the belt will be turned to the inside and sewn down. |
Step 17- Make and attach the belt loops. Cut a 2"x10" piece. Turn it inside out and sew a 1/4" seam. (Make whatever side you want the right side- I wanted the green to blend the belt loops in). Turn the tube inside out and press, then cut in half so you have two 5" pieces. Turn the ends to the inside like you did with the belt ends- be sure both belt loops end up the same length after doing this! Then put your robe on so you can figure out where you want your loops to be. Mine are up a little high so it ties above my big baby belly, but not so high that it will be weird someday when my belly is flat again (can't wait!!!) Pin in place at the center of the loop. Measure to check that they are even. Then fold under the edges about 1/4" and sew in place. I went over it a couple times to be sure it was tacked down securely.
 |
| Be sure to measure and adjust as needed so your loops are even on both sides! |
 |
| Last step!!! Yay! |
| |
Step 18- Try on your robe with belt, and admire your sexy self in a mirror. You may want to iron out that crease down the back, but it will eventually go away. Enjoy your comfy, silky, Kimono Robe!
 |
| Oh, yeah...so HOT! (No really, these hormones are making me sweat, haha!) |
Remember that this is for personal use only (yourself, gifts, etc.) Please contact me if you are interested in making these to sell and I can give you the pricing for commercial license based on quantity.
Are you a follower yet??? Google is getting rid of Friend Connect in a bit, so please follow via the new Linky, or use RSS or email. You can also follow me on Facebook and Pinterest!


Very cute robe! The one I had was terrible! You will be the most stylish mom on the maternity floor!
ReplyDeleteYah, the maternity store needs to step it up! I hate those ugly patterns they always have!
ReplyDeleteGreat tutorial! I hope your baby comes safely! Thanks for commenting on my blog... I'm your newest follower! :-) Sewloveit.blogspot.com
ReplyDeleteThanks Christy!!! I am going to swing by!
ReplyDeleteVery cute!
ReplyDeleteThanks! Baby Stella arrived safely and stylishly!
ReplyDeleteAfter many weeks of trying to pre-empt what he would like as a gift imagine our surprise when he approached me one morning asking for a hooded bathrobe with his initials on it, just like he'd seen a pop star or other wearing some MTV programme or other. Where on earth was I going to find a hooded monogrammed kids bathrobe.
ReplyDeleteHi! Thank you for this great tutorial. I'm working on my own version of this lovely kimono right now and was wondering if you could explain in a bit more detail how you curved the corners with the French seam. I've figured out (through trial and error!) that a French seam is just not possible on the right-angle, the underarm area. How sharp or generous is the curve?
ReplyDeleteHi, So sorry, I have been on a blog break. I just went "slow and steady" on that one and made a pretty sharp curve. I had to clip a v on the corner I think. If you did some trial and error and came up with a better way, please share!
DeleteOMG!!! Thank you!!! Congrats on your baby! I have been trying to find a tutorial on this for forever! I can't wait to use my Jo Ann's coupons! Perfect for getting ready at someone's house or lounging around at home.
ReplyDeleteI still wear mine all the time! I'm sure yours will turn out cute :)
DeleteTHANKS for this post! I've been looking for something like this to make a costume for Burning Man!
ReplyDeleteI'd love too a pic! You should post one to my facebook page!
DeleteWow, superb weblog layout! How long have you ever
ReplyDeletebeen running a blog for? you made running a blog glance easy.
The total glance of your site is fantastic, as well as the content!
Look at my page ... http://www.nautilus-fitness.ru
Just what I needed. Can't find anything like this ready made, and it looks so easy. Fabric shopping tomorrow!
ReplyDeleteHi! Thanks for posting this tutorial. I am a sewing novice. This was my first attempt at making an article of clothing. It worked out pretty well. Check out my blog post: http://heheheplusshe.blogspot.com/2013/06/a-robe-fit-for-queen.html! I'm extremely proud of myself.
ReplyDeleteI'm looking for an easy tutorial on making a gown. Do you have any suggestions?
Long Term Rentals in paphos car hire without encountering that much
ReplyDeletestress and hassle. Hence, regardless of a business trip,
such as $9.
Informative article, just what I wanted to find.
ReplyDeleteHere is my web blog ... Fast Weight Loss Diets
What's up Dear, are you genuinely visiting this web page regularly, if so afterward you will absolutely take fastidious knowledge.
ReplyDeleteAlso visit my webpage :: HCG Diet Plan
Another available treatment option that can be done at home without a prescription is
ReplyDeletea topical ointment. Fortunately, there are a variety
of skin tag removal treatments you can use. Skin tags can affect
you and anybody else at any age and irrespective of your skin type.
Also visit my webpage :: how to stop skin tags ()
I was very happy to discover this web site. I want to to thank you for
ReplyDeleteones time for this particularly fantastic read!! I definitely liked
every little bit of it and I have you book marked to look at new information on your
website.
Look at my blog; symptoms for asthma *paninicomics.de*
Thank you for this! I'd looked and looked for an idea that would work to make a kimono out of 30" wide silk my son had brought me from one of his trips to Asia. I finished it this afternoon with some mods for said width. I love it! Thanks!
ReplyDeleteThis is great, thanks for sharing. My sister wants me to make robes for her bridesmaids.
ReplyDeleteIt looks so gorgeous!! I like you craft work and it is not a easy task to sew such types of dressing gowns for women.
ReplyDeleteHats off for your this work!!!
This is a very pretty silk kimono robe and you can actually made it in Japanese style. Can't wait to do make something like this, too, for myself. :-)
ReplyDeleteI am excited to try this before I have my baby but I was wondering how you think it would work with different types of fabric. I want something with a little stretch to it so I was thinking of trying it with a knit fabric. Would you do anything different if you were using that?
ReplyDelete