Sunday, February 26, 2012

Healthy and Yummy Smoothie Recipe

I love smoothies- they are an easy and tasty way to squeeze in some extra nutrition.  The best part is, I make mine different every time based on the ingredients I have available.  This gives my body some variety vitamin-wise, and helps me use up stuff in my fridge!
mmmm, frothy!

Now, I know the green color might turn you off a bit.  It is kinda weird!  But I promise you it doesn't TASTE green :)  When LJ drinks it she calls it ice cream!

So what do you put in a smoothie?

A MILK
This can be cow's milk, goat milk, soy milk, almond milk...whatever you fancy.  You could even do some yogurt.
A GREEN OR TWO
The best "starter" green is raw spinach since you probably already eat that sometimes.  I like to use kale.  Today I used a purple kale but it still looks green when all ground up.  Using a variety of greens can give you a lot of healthy, fresh vitamins!
OTHER VEGGIES??? 
Carrots are always good because they are sweet.  Don't add any spicy veggies or it will not taste good!
SOME FRUIT
The fruit really makes it taste good and sweet.  I like bananas because they make it smoother and creamier.  I also added an apple today.  Pineapple is really yummy in a smoothie if you have one.
SWEETENER???
This is up to you.  A bit of honey or maple syrup can add the right touch if you just don't think its sweet enough.
EXTRA FLAVORS
Vanilla extract (the real stuff), cinnamon, fresh grated ginger...use your imagination/mood to guide you!
PROTEIN
If you need extra protein in your diet or are using this as a meal, I would suggest adding some protein powder or plain silken tofu.  If you want to be a little indulgent, try the chocolate or vanilla silken tofu.  It is a liquid-y tofu that is like a dessert! Or you could add a nut butter- if you do this I would stick to fruits that you think taste good with peanut butter.  For example, I would not do a kiwi with it!

Some of my ingredients for today!
Be sure to wash all of your ingredients well, since you will be eating this raw.  It is also a good idea to use organic whenever possible.  We are lucky to have a lot of organic produce available where we live.  I even use a home delivery service that actually SAVES me money!  (Green B.E.A.N. Delivery)  Check them out- they are slowly expanding over the Midwest if you are in the area. (I am not spokesperson, just a fan!)

Throw in some ice cubes and blend on the highest setting of your blender until smooth and frothy.  You can keep the extra in your fridge to drink throughout the day, but be sure to give it a good stir first.  I personally don't keep mine overnight, I think it should be eaten the day of.

Enjoy your smoothies and comment below if you come up with any awesome combos that I should try!

Remember to please become a follower so I can reach my next goal and do another GIVEAWAY!!!

Wednesday, February 22, 2012

FREE pattern- crochet baby turban


So, the idea for this pattern started with Pinterest.  I'll take a moment to vent here....don't you HATE it when you want to pin something, and it goes to flickr instead of the original page?  Or you click thinking its DIY and its a shop?  Or you click and its in another language?  Well, this one was in another language, so I attempted to have Google translate it.  I was so bummed to see that it was knitting, because I am not big on knitting, nor am I very good/fast at it.  So I decided to simply use it as inspiration to create my own crochet pattern.
(And PLEASE, if you pin something, check first to make sure its from the original source so us bloggers/creators get credit for our hard work!)
So here is the picture- can you blame me for wanting to pin this?  What a cutie!!!!  (The hat and the baby!)  It is from a blog called Pickles.
credit here
You can see that mine is not completely the same, and that's okay- I don't want to completely copy it, just recreate the "feel" of that adorable little turban!  I've had this done for a while but had to wait for my model to be born :)

Crocheted "Stella" Turban (NB-3 months)

Size H crochet hook
1 skein cotton yarn (I used Sugar N' Cream)
abbreviations: sc (single crochet), sl st (slip stitch), hdc (half double crochet)

Round 1: Make 6sc in a Magic Ring (click through to link to get the how-to), pull string to close hole.
Round 2: Make 2 sc in each stitch around and join with sl st. (12)
Round 3: (2sc, 1sc) all around and join with sl st. (20)
Round 4: (2sc, 1sc, 1sc) all around and join with sl st. (27)
Rounds 5-6: (2sc, 1sc, 1sc, 1sc) all around and join with sl st. (34, 43)
Rounds 7-11: sc all around , join with sl st. (43)
Round 12: hdc all around, join with sl st. (43)
Round 13: sc all around, join with sl st. (43)
Round 14: hdc all around, join with sl st. (43)
Round 15: sc all around, join with sl st. (43)
Round 16: hdc all around, join with sl st. (43)
Round 17: turn and sl st all around.  Weave in ends.
Finishing:  Count up 7 rows and insert a piece of yarn.  Tie up from last row to form front of turban.  Cinch tightly!  Wrap ends around tightly and tie again (tie knot on inside).  Weave in ends.  Cut 3 pieces of yarn about 7" long.  Insert through loop on front and tie a bow tightly.  Double knot and trim ends of bow.

She slept almost three hours wearing this...maybe it will keep your little one cozy and sleepy too?   5 days old today!

That's it!  If you make one please link to it below so I can see :)
Remember, this is for personal use only!

Are you a follower yet?  Join me via linky, RSS, email, or FB!  Google is getting rid of friend connect soon, so I am trying to get followers to move to one of the above methods!

When I reach my current followers goal I will do another giveaway!!!

Saturday, February 18, 2012

She's Here!

Stella Mae is here!  Everything went well- once her head popped out she opened her eyes and looked around like a little gopher..."Where am I?  What is going on here?"
We are both feeling great and doing fine.
Big sister asked mommy today (while patting my belly) "Hey Mama, you got another baby sister in there for me?"  So, I think it's safe to say she likes being a big sister so far.
Here are a couple photos for you!
Hello world!  I'm here!
"I gonna pet baby sister, Mama!"

Thursday, February 16, 2012

Wildflowers Baby Mobile Tutorial

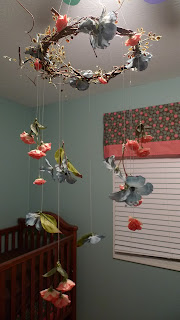
It's almost time for this baby and as I've told you I have been a BUSY bee making projects for her!  One project that I finished this week is the Wildflowers Baby Mobile.  It turned out even cuter than what I had envisioned! (Love when that happens!)
I think this could even be used in places other than a nursery.  It is so whimsical and romantic, girlie and unique!  So even if you don't have a need for this in a nursery, you could add some white Christmas lights and use it as a little chandelier, etc.  Let me know if you come up for another use for this project!

So, you want to make one? Let's get started!

Gather your materials!
Materials Needed:
-One long flexible floral stem with leaves/branches
-2-4 floral stems with several flowers each in the color scheme of your choice (this is up to your creativity- you can use as many flower types, colors, etc. as you choose!)
-Floral tape, wire, or "vine" (I used the faux flexible vine stuff)
-Clear elastic jewelry thread (use a thick gauge for durability!)
-Hot glue gun and hot glue sticks
-Tiny metal hook for hanging

Step One-
Take the long leafy/branchy stem and wind it into a circle.  Mine is about 12" in diameter but make it the size you think looks best for your space. 
I bent some of the leaves the opposite direction so they were all over.
Step 2-
Use your floral tape or vine and wrap it around to firmly attach the ends.  Be sure that the circle will not be coming apart!
See how nice the vine wire blends in?
Step 3-
Prepare your flowers.  Pop off some individual flowers and some groups of flowers (it might depend on the types you bought).  The point is to try and get some variety in how they are grouped.  Use the glue gun to be sure all the flower parts are reinforced.  Faux flowers can pop off into tiny pieces that could be a choking hazard so this step is VERY important both for durability and safety.  It takes some time, but is well worth it!
Gluing base on securely.
Step 4-
Decorate the circle with flowers from all angles- you want the mobile to look pretty from the baby's view, not the top!  The sides should be pretty too since you will see that in the room...but mainly keep in mind the baby's view.  Try not to follow a regular pattern, this needs to be very organic looking!
Don't be shy with the glue!  Have fun arranging your flowers in random places.
Step 5-
Begin attaching the hanging parts.  I put a drop of hot glue on the end of the clear elastic thread, then inserted it into the hole at the base of the flowers.  Some of the blue ones in clumps didn't have a hole, so I glued the thread to the side (about 3/4" of it for durability).  Vary the lengths of the thread so the flowers hang randomly!
See how nicely the elastic thread fits in the base of the flower?
Step 6-
Tie the elastic threads to the circle and glue well.  Again, you don't want this to be too uniform- space them out differently and be sure that there are a variety of flowers- colors, single flowers, bunches of flowers, etc.  It's best to lay them out ahead of time to plan.
Glue the knot, but be careful not to melt through the plastic!  These knots will not hold well without the glue.
Step 7-
After all of your flowers are attached the way you like it, attach four equal lengths of the elastic thread to the top of the circle and knot at the top.  Then screw a hook into the ceiling and hang the mobile on the hook!
Mine is not above the crib yet- waiting on my Dad to bring the hook over!
Some ideas for variations-
-Use a floral stem for the circle and hang lightweight birds or butterflies from the elastic thread!
-Make one that is all leaves.
-For a boy, it would be cute to use leaves and hang some lightweight plastic lizards, caterpillars, etc.
The sky is the limit to your creativity!!!
Let me know if you try it and post a link below so I can see it!

Please remember that this tutorial is for personal use only.  If you pin to Pinterest, please use the top photo with my website watermark on it!  Thanks so much!

***Are you a follower yet?  When I reach my current goal I will do a GIVEAWAY!!!***  Google is getting rid of Friend Connect this Spring, so please follow via RSS, Facebook, Linky, or email if you don't mind :)

Tuesday, February 14, 2012

Have you tried Clipix yet?

Clipix is my new favorite online tool and pastime.  It is a way to keep EVERYTHING you find online organized, not just things with photos.  You basically create as many clipboards as you want, then load them up with things as you come across them on the web.  You can create them as you go really fast.  So, if you find that one day you have the urge to clip every chocolate chip cookie recipe ever published to the web, well, you can make a clipboard for that on the spot!  I created this one for collecting home decor ideas:

(Do you see where I clippied something that didn't have a photo?  You can just type in a description- perfect!)

I have been having fun trying out the clip button- you put it at the top of your browser so it's always there!  It literally took me 3 seconds to install, it is that easy.  My clipboard for "Interesting Articles" has been great- oftentimes I find an article I want to read, but then my daughter wakes up from her nap.  No problem!  I can simply clip it for later.  Or, I find something I want my husband to read- I can clip it, and share the clipboard with him and he sees it pop up right away! (What a great feature!)  You also have the option to choose who can see each clipboard.  So, if I want to make a clipboard that collects something potentially embarrassing or none of anybody's business, I CAN!  (Like maybe a page for bras and undies I want to buy, or articles on a personal medical problem).  These two features- sharing with specific people and the ability to make a clipboard private, are my favorite features unique to Clipix.

If you look at the screenshot above, you can see how easy it is to share your clips.  You can even email it to someone who doesn't have Clipix. 

I would love it if some of you would sign up and check out my public clipboards.  If you are interested in signing up for clipix, head over to their website and get started!  Leave a comment below and let me know what other ideas you have for using it!

Here is a short video if you want to see more:

Promoted Post
Visit Sponsor's Site