You all know that I am VERY pregnant right now- and this baby is going to come any time!
I have been working on nursery projects and will have some fun things to share with you in the upcoming weeks- I'm going to spread it out a little. Here is a little list of what's upcoming...
-Box pleat window valance tutorial
-Cloth diaper "wet bag" tutorial
-Wildflowers baby mobile tutorial
-2T and infant Easter dresses tutorial (and maybe a pattern...we'll see!)
I also have been using some other tutorials to make things, like this one from With a Tangled Skein for a crochet wool diaper cover, and this one from Sew Much Ado for a nursing cover.
Anyways...if you like newborn baby girl pictures keep your eye on my blog because there will be some soon! I can't wait to see who she looks like, and what her little personality is like...I know my 2 year old has personality to spare, haha!
Tuesday, February 14, 2012


Sunday, February 12, 2012
Ladies Kimono Robe- A Tutorial!
Guess what? I actually sewed something for myself this week! It turned out just as planned, I love when that happens!!! So I am sharing the tutorial with you. I searched a lot online and couldn't find any other free pattern or tutorial for a Kimono Robe, so I hope a lot of people find this who want one. (Please remember to link to me if you post about it!) It is so comfy, and one size fits most! (I would say realistically a size Small-Large as my 9mos prego belly is completely covered in it and I am normally a Medium.) You could very easily make a longer version of this by buying more yardage and lengthening the inches in Step 1.
I made this to take to the hospital with me, as the maternity robes out there are less than stylish, and I wanted something unique! While I did make this generous enough to fit a pregnant belly, it is not just for pregnant chicks- any woman (and some men, haha) would love to relax in a roomy, silky robe, right?!?!?! The best part? I got this beautiful fabric on sale at Hancock for only $2/yard! So my whole robe cost about $5.
So, here is the tutorial...enjoy! If you make one, please link up a photo below because I would love to see it!
ToBeContinued Ladies' Kimono Robe
Materials Needed:
2 1/2 yards silky brocade fabric (44" wide) (If you want a contrasting trim like mine, choose a fabric that has a pattern on the edges and is completely reversible. Most brocades are.)
Matching thread
Sewing machine, scissors, quilting ruler, and other sewing tools as needed.
Step One- Cut a length of fabric that is 74".
Step 2- Fold the fabric in half along the widest side and pin the edges together to prevent slipping. I did this on the (thread/scrap covered) floor to give myself lots of room!
Step 3- Cut the center and neck out. Measure out 3" from either side of the crease and mark all the way to the bottom hem. (In other words, 6" out of the center.) Then cut- this is for the TOP LAYER ONLY!
Step 4- Cut out the neck. Mark a very slight half-moon shape for the neck and cut.
Step 5- Mark sleeves and body. I used a large quilting ruler for this- once again that fold going down the center will come in handy! For the sleeve shape, measure 10" down from top fold (the shoulder/arm) and 15" out from the center crease. Mark. Then continue marking the 15" mark to the bottom hem.
Step 6- Carefully cut out the L-shaped marking. It is looking like a Kimono already!!! (SAVE YOUR SCRAPS- we will be using them!)
Step 7- Pin the bottom side of the sleeve and down the sides. Yes, we are pinning on the RIGHT side of the fabric- because a French Seam is a MUST with this kind of silky, stringy fabric. (You certainly could use a serger, but it would be a little scratchy and you still could get a few loose strands. Therefore, my seam allowances are for French seams). Usa a lot of pins because this is slippery fabric! Normally I like to pin horizontal to the seam, but to prevent slippage I find that vertical is better with this type of fabric.
Step 8- Sew a very scant 1/4" seam. Curve carefully at the armpit.
Step 9- Trim any stringy things hanging off and press the seam. Then turn the robe inside out.
Step 10- Sew a generous 1/4" seam to be sure you have encased the raw edges.
Step 11- Hem the arm holes and bottom. Simply fold over 1/4" and press, then another 1/4" and tack down. Sorry, no picture of this!
Step 12- Make the trim. This part is cool, because you simply use the parts you cut out to make the arms and body. You should have 4 identical pieces sitting there. Simply sew them end to end! I used the gold side of my fabric as the "right" side for the trim so it would have a pretty contrast to the robe. It also utilizes that pretty pattern on the edges of the fabric! You will need to iron it like bias tape- in half, then fold in each side about 3/4" (NOT all the way to the center crease as you would bias tape- we want to see that pretty pattern!) This will be a little bit longer than what you need, but we will cut off the extra at the end. For now, mitre in the corners and fold over one end. Baste in place.
 Step 13- Pin on trim. Pin very carefully! I placed it so the raw edge of the robe was about 3/4" inside. This makes it nice and stable when you attach it. When pinning around the neck it will be a challenge to get it to lay flat, but do your best.
Step 14- Sew the trim on carefully. I went nice and slow to be sure it was going on smoothly- especially around the neck! You may find that the trim stretches a bit as you go around and you need to adjust your pinning for the second side. This is fine, and that is why we didn't cut the excess off yet! Stop with about 3" to go on the bottom of the second side.
Step 15- Finish off the bottom edges of the trim. When you get to the bottom of the second side, you will have excess fabric. Cut it off leaving about a 1" overhang. Mitre the corners as before and fold under, then baste down. You can then finish that last 3" that you left unsewn. Sew along the very bottom edge of the trim, being sure both sides are lined up perfectly. Do this for both sides.
Step 16- Make the belt. Cut two 3" wide strips running the entire width of the fabric (44"). Sew them end-to-end, making the color you want as the right side (I again used the gold for contrast). Then sew a 1/4" seam down the length, reinforcing with a zig-zag stitch or serger. Turn this tube inside out, press, then turn ends to the inside at a slight angle and press then stitch down.
Step 17- Make and attach the belt loops. Cut a 2"x10" piece. Turn it inside out and sew a 1/4" seam. (Make whatever side you want the right side- I wanted the green to blend the belt loops in). Turn the tube inside out and press, then cut in half so you have two 5" pieces. Turn the ends to the inside like you did with the belt ends- be sure both belt loops end up the same length after doing this! Then put your robe on so you can figure out where you want your loops to be. Mine are up a little high so it ties above my big baby belly, but not so high that it will be weird someday when my belly is flat again (can't wait!!!) Pin in place at the center of the loop. Measure to check that they are even. Then fold under the edges about 1/4" and sew in place. I went over it a couple times to be sure it was tacked down securely.
Step 18- Try on your robe with belt, and admire your sexy self in a mirror. You may want to iron out that crease down the back, but it will eventually go away. Enjoy your comfy, silky, Kimono Robe!
Remember that this is for personal use only (yourself, gifts, etc.) Please contact me if you are interested in making these to sell and I can give you the pricing for commercial license based on quantity.
Are you a follower yet??? Google is getting rid of Friend Connect in a bit, so please follow via the new Linky, or use RSS or email. You can also follow me on Facebook and Pinterest!
 |
| Please pretend my face isn't swollen to twice its normal size- I'm popping this baby out in about a week! |
I made this to take to the hospital with me, as the maternity robes out there are less than stylish, and I wanted something unique! While I did make this generous enough to fit a pregnant belly, it is not just for pregnant chicks- any woman (and some men, haha) would love to relax in a roomy, silky robe, right?!?!?! The best part? I got this beautiful fabric on sale at Hancock for only $2/yard! So my whole robe cost about $5.
So, here is the tutorial...enjoy! If you make one, please link up a photo below because I would love to see it!
ToBeContinued Ladies' Kimono Robe
Materials Needed:
2 1/2 yards silky brocade fabric (44" wide) (If you want a contrasting trim like mine, choose a fabric that has a pattern on the edges and is completely reversible. Most brocades are.)
 |
| close-up of my fabric |
Matching thread
Sewing machine, scissors, quilting ruler, and other sewing tools as needed.
Step One- Cut a length of fabric that is 74".
 |
| With slippery fabric like this, pin pin pin! I also used fabric weights to hold it in place while cutting. Rotary cutters work best for this type of long cut. |
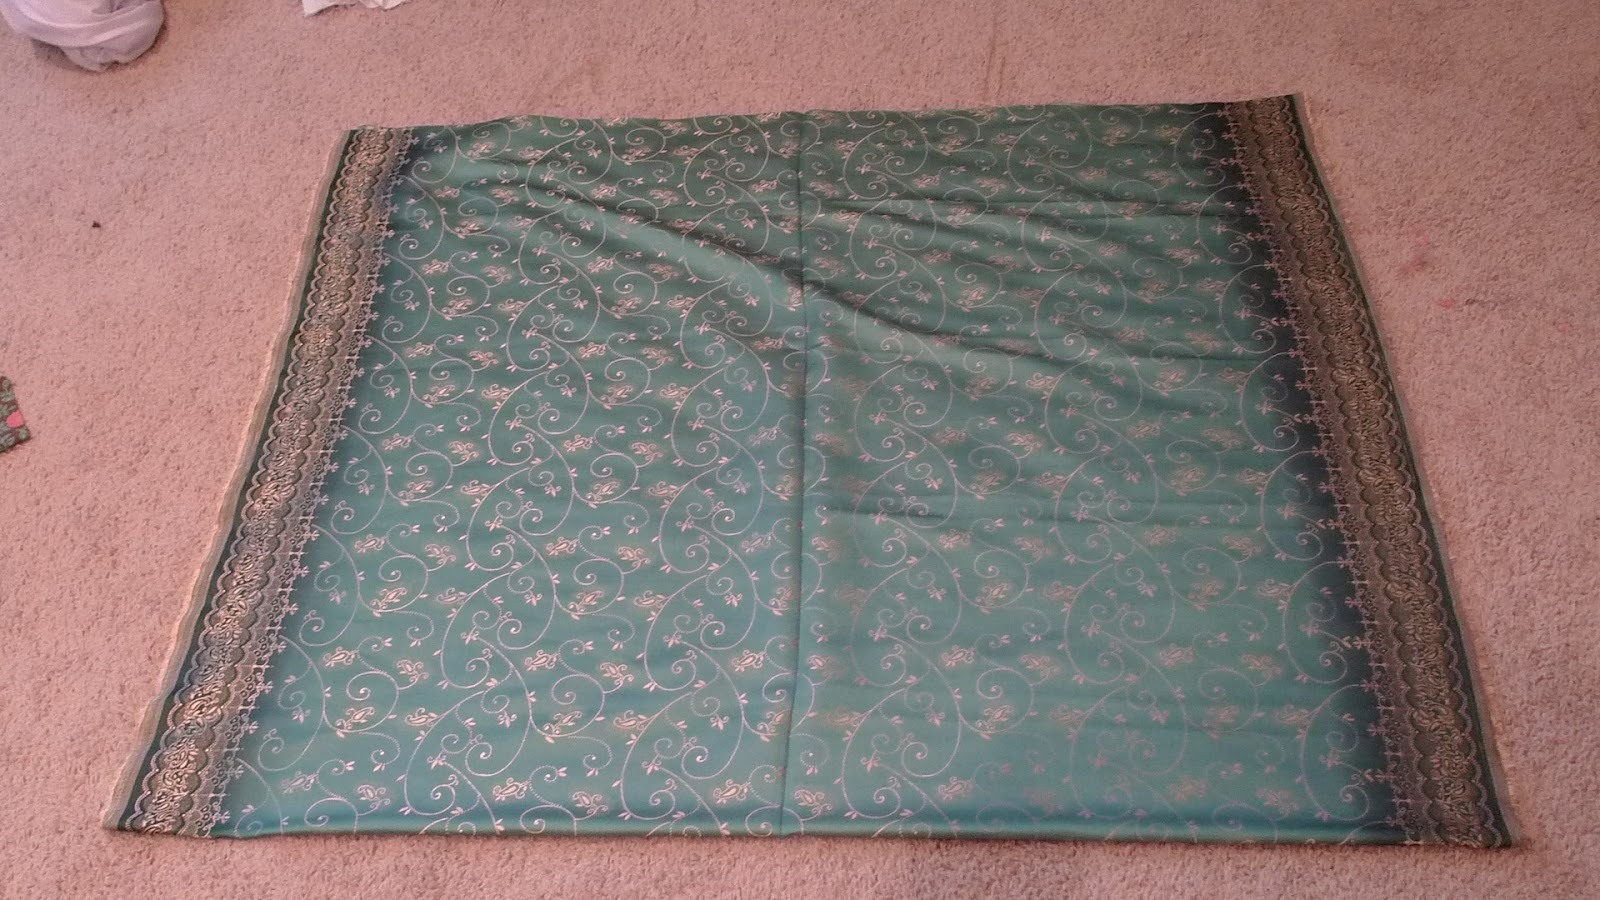 |
| Hopefully yours has this handy crease down the middle from being on the bolt. If not, you may want to iron one in to help with the next few steps! |
 | |
| I used my hand-held Gingher shears for this since I needed to cut the top layer only. |
 |
| Don't stress if it isn't perfect- you will be covering this with a very wide binding. (Can you see how wonky mine is, haha!) |
 | |
| If you want an even wider sleeve, feel free to go 11" or 12" down. I found that 10" was just right for me though. |
Step 6- Carefully cut out the L-shaped marking. It is looking like a Kimono already!!! (SAVE YOUR SCRAPS- we will be using them!)
 |
| Getting there- I love when it actually starts to look like something! |
Step 8- Sew a very scant 1/4" seam. Curve carefully at the armpit.
 |
| Note how the fabric is inside the edge of the presser foot. |
Step 10- Sew a generous 1/4" seam to be sure you have encased the raw edges.
 | ||
| Your gorgeous French Seam is taking shape! No scratchy stuff against your skin, and no loose threads! |
 | |
| Et voila! Tres jolie! |
Step 12- Make the trim. This part is cool, because you simply use the parts you cut out to make the arms and body. You should have 4 identical pieces sitting there. Simply sew them end to end! I used the gold side of my fabric as the "right" side for the trim so it would have a pretty contrast to the robe. It also utilizes that pretty pattern on the edges of the fabric! You will need to iron it like bias tape- in half, then fold in each side about 3/4" (NOT all the way to the center crease as you would bias tape- we want to see that pretty pattern!) This will be a little bit longer than what you need, but we will cut off the extra at the end. For now, mitre in the corners and fold over one end. Baste in place.

 |
| I used my quilting ruler again to be sure the trim was going on evenly as I pinned. |
 |
| Stick as close to the edge as possible! You can always go back on the "wrong" side and be sure you caught the edges there too. |
 |
| Neat and tidy! |
 |
| The ends of the belt will be turned to the inside and sewn down. |
 |
| Be sure to measure and adjust as needed so your loops are even on both sides! |
 | ||
| Last step!!! Yay! |
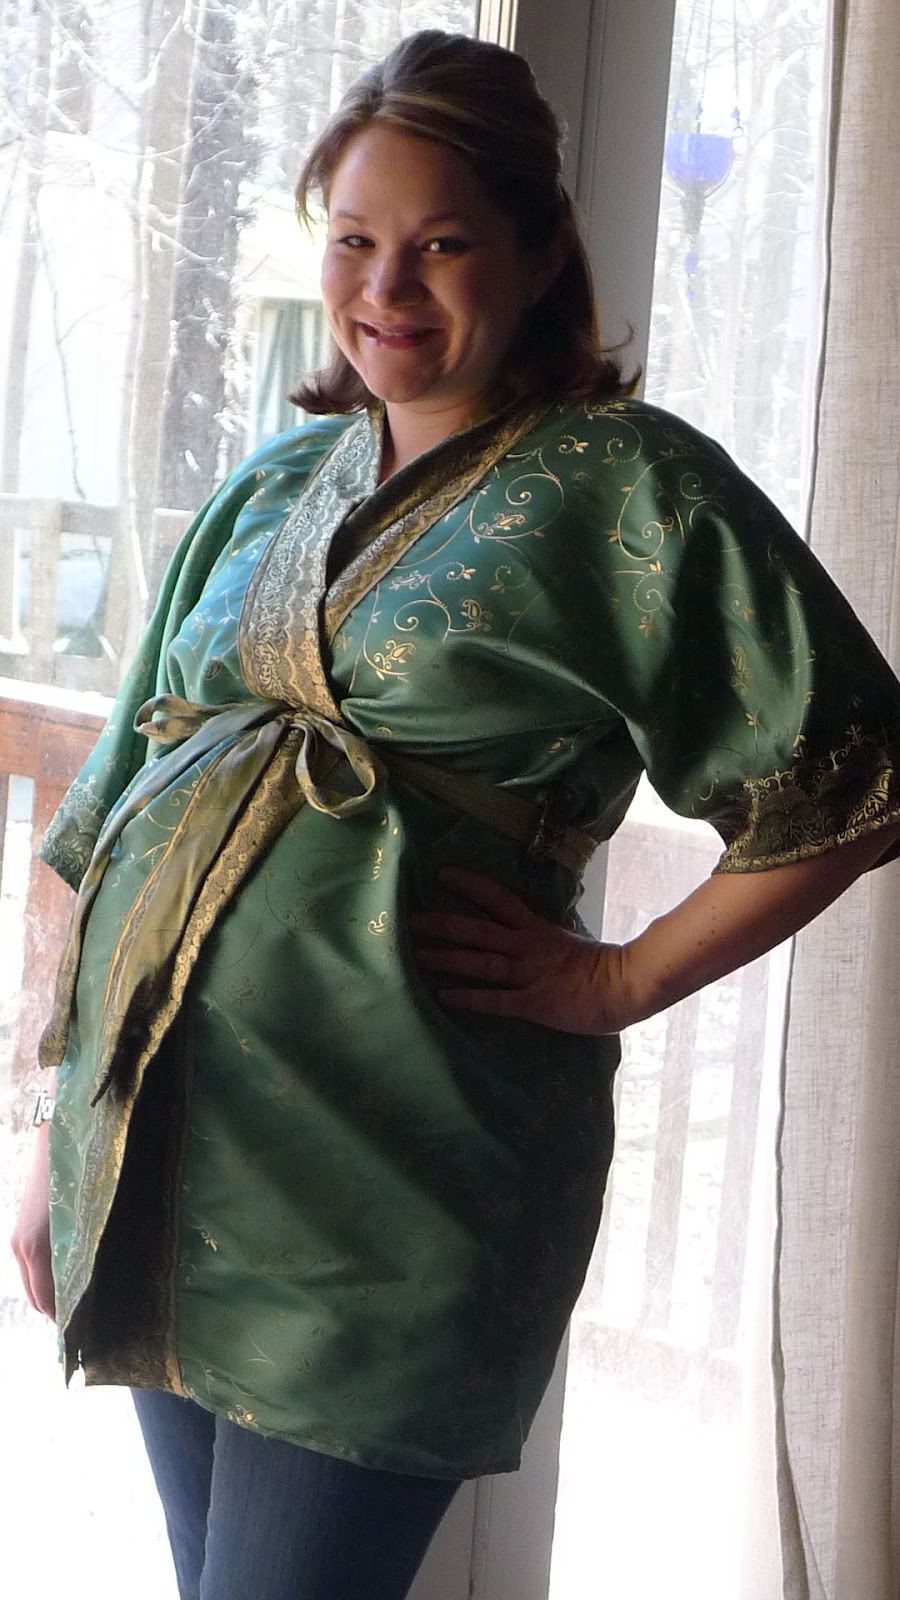 |
| Oh, yeah...so HOT! (No really, these hormones are making me sweat, haha!) |
Remember that this is for personal use only (yourself, gifts, etc.) Please contact me if you are interested in making these to sell and I can give you the pricing for commercial license based on quantity.
Are you a follower yet??? Google is getting rid of Friend Connect in a bit, so please follow via the new Linky, or use RSS or email. You can also follow me on Facebook and Pinterest!
Friday, February 10, 2012
Baked Pasta- my recipe!
With the birth of our second little girl coming up, I have been trying to double up on some of the meals I make so I can have a stash ready to go in the deep freezer. For some reason it seems like Italian food is more freezer-friendly than some others because I've made meatballs too! I haven't really done casseroles because a lot of them call for canned things and we don't do canned at my house (we will do things in a glass jar though).
This week I decided to do a baked pasta. It is similar to lasagna, but you don't have to fool with the layering so its a bit faster! Also, LJ likes to eat noodles so she will eat more if I make it this way.
Lower Fat Baked Pasta
1 box whole wheat pasta (I used rotini) cooked to al dente
1 glass jar pasta sauce (I used garlic and basil)
1 package of sweet italian turkey sausage, removed from the casing, cooked and crumbled
1 15oz container of low fat ricotta
1 package of shredded mozarella
1/4 cup shredded parmesan cheese (better to shred real cheese!)
1 large egg
Italian Seasoning (I love the Organic Northern Italian Seasoning from Costco)
...and the easy instructions
-Preheat oven to 75 degrees F
-Mix together ricotta, 1 teaspoon italian seasoning, the egg, and about 3/4 of the bag of cheese.
-In pan, stir together pasta, sauce, and sausage. Then top with the ricotta mixture and stir gently (you don't want the ricotta mixture 100% incorporated).
-Top with remaining cheese mixed with the parmesan.
-Bake for about 30 minutes or until bubbly and cooked through (remember, the egg needs to be cooked all the way!)
I served it with some Alexia garlic bread- one of my favorite natural/organic brands. I could make my own garlic bread, but this was on sale anyways this week and it was so easy!
Enjoy this simple recipe- I know it was one dish I had forgotten about for a while but its so easy! It goes great with a nice salad and would be perfect if you need to take a meal to a friend for some reason since it can go from freezer to oven. I did not pre-bake the one I froze- so it will need to bake longer when I take it out of the freezer but will taste better. Just include instructions for the person you give it to!
LJ was very pleased...and I think she is having a growth spurt because she ate THREE helpings!
This week I decided to do a baked pasta. It is similar to lasagna, but you don't have to fool with the layering so its a bit faster! Also, LJ likes to eat noodles so she will eat more if I make it this way.
 |
| Fresh out of the oven, yummy! |
1 box whole wheat pasta (I used rotini) cooked to al dente
1 glass jar pasta sauce (I used garlic and basil)
1 package of sweet italian turkey sausage, removed from the casing, cooked and crumbled
1 15oz container of low fat ricotta
1 package of shredded mozarella
1/4 cup shredded parmesan cheese (better to shred real cheese!)
1 large egg
Italian Seasoning (I love the Organic Northern Italian Seasoning from Costco)
...and the easy instructions
-Preheat oven to 75 degrees F
-Mix together ricotta, 1 teaspoon italian seasoning, the egg, and about 3/4 of the bag of cheese.
-In pan, stir together pasta, sauce, and sausage. Then top with the ricotta mixture and stir gently (you don't want the ricotta mixture 100% incorporated).
-Top with remaining cheese mixed with the parmesan.
-Bake for about 30 minutes or until bubbly and cooked through (remember, the egg needs to be cooked all the way!)
 |
| In the oven! |
Enjoy this simple recipe- I know it was one dish I had forgotten about for a while but its so easy! It goes great with a nice salad and would be perfect if you need to take a meal to a friend for some reason since it can go from freezer to oven. I did not pre-bake the one I froze- so it will need to bake longer when I take it out of the freezer but will taste better. Just include instructions for the person you give it to!
LJ was very pleased...and I think she is having a growth spurt because she ate THREE helpings!
 | |
| She insisted on trying to use her toy doll fork. Not a huge success! |
 |
| I guess we need to make a "feet" rule now... |
 |
| She can't take my picture any more if I can't see her, right? |
 |
| ...and a self portrait with Mommy's camera. |
Tuesday, February 7, 2012
How to Create a Keepsake Cookbook!
If you have ever wanted to come up with a gift for the cooks in your family, a recent college grad, or a bride-to-be, then how about a cookbook?
All you need to do is email (or in the case of Grandma, visit!) and get some of everyone's favorite recipes. Be sure to include any traditional comfort foods that you grew up eating, or anything of religious or cultural significance to your family.
Once you have all of this gathered up, decide on how you will organize it. By person? By season? Food type? It's really up to you! For that matter, you could make an entire dessert cookbook, Christmas cookbook etc. if you wanted! Be creative!
Now, for "presentation." This depends on what skills you have! If you are a scrapbooker, you might want to go all out and hand make it. But what if you want several copies? You could always type it up and add clip art or family photos. Or you can follow the link below and use The Family Cookbook Project (they will do the work for you!)
So take the idea and run with it, make it your own, and surprise someone (or several people) with a very special gift!
All you need to do is email (or in the case of Grandma, visit!) and get some of everyone's favorite recipes. Be sure to include any traditional comfort foods that you grew up eating, or anything of religious or cultural significance to your family.
Once you have all of this gathered up, decide on how you will organize it. By person? By season? Food type? It's really up to you! For that matter, you could make an entire dessert cookbook, Christmas cookbook etc. if you wanted! Be creative!
Now, for "presentation." This depends on what skills you have! If you are a scrapbooker, you might want to go all out and hand make it. But what if you want several copies? You could always type it up and add clip art or family photos. Or you can follow the link below and use The Family Cookbook Project (they will do the work for you!)
So take the idea and run with it, make it your own, and surprise someone (or several people) with a very special gift!
Monday, February 6, 2012
What Makes You Blush?
What makes you blush? It takes a lot for me. My husband? Not so much. I think he blushed for the first year of our relationship because he was getting used to my family and I being so open about everything, haha! That, and he is of 100% Irish descent, so his skin is very fair and turns red at the drop of a hat!
But, I am not actually planning to talk about blushing for real today. I am talking about blushing "for fake."
I got a lot of good feedback on my last make-up post so I thought I would try another!
So, here is my blush round-up. These are all products that I have tried myself and are my favorites. I am not getting paid to write this post, these are all my own opinions :)
1. My fave Natural/Everyday Option
Stila Convertible Color $25
This is by far my favorite at the moment. This product is in a very creamy, user-friendly form. You just stick your finger in there, pat it on to blend, and you're done. You can layer more on to make the hue more intense, or really blend it in to be subtle. The best part? It's not just for cheeks! It looks great on lips too! I like the color "Lillium" because I am fair-skinned. It's a really pretty soft peachy-pink color. It definitely lasts all day, and you can even layer some powder blush on top if you want. It is WELL worth the price, it will last forever and is a high-quality natural product (no parabens, etc.)
2. My fave Evening/Date Night Option
Vincent Longo Lip and Cheek Gel Stain $22.50
This is a fabulous, long-lasting, and highly pigmented option. I love to use this when the occasion calls for a little more drama! It can be a bit challenging to get the hang of and can make a mess of your fingers if you aren't careful. I have found that the applicator is NOT what you want to use to apply it. While it is a gel, it is still quite liquidy. With the high level of pigments, anywhere you put it will be pretty permanent (at least for a day or so) so you need to be careful! If you follow their instructions and have well-hydrated skin and lips before application, it will glide on and blend smoothly. Yes, I said skin and lips because this is another multi-tasking product! If you use it on your lips, a nice gloss over the top looks fantastic. I have the color "Baby Boo". This is another one where a little goes a long way, so you can spend the money knowing it will last a long time!
3. A Powder Option for layering
LORAC Powder Blush $20
This is a great, high-quality powder blush. I use the color "Soul" which is a brownish-rose color. It can almost double as a bronzer too. I use powder blush over a cream option usually, to add extra staying power or to brighten the apple of my cheeks. Powder blush is also great for contouring. Another bonus? It is very easy to apply!
4. A Bargain Option!
Organic Wear (TM) 100% Natural Origin Blush $11.95
This is a great line of products created by Physician's Formula. You can get it at Drugstores, Grocery Stores, and Ulta. This line is the first ever in the cosmetic world to be certified as having Organic ingredients! (There are other products that have FDA certified ingredients- this is a new cosmetic certification).
I love their face powder, and this blush is fantastic too. It can be soft, or you can add more to build up intensity. I love the color "Blushing Organics". I highly recommend the entire product line as all that I have tried are fantastic (and the price is right!) The only drawback at all is that the pallet tends to wear out where it bends, but its magnetized so you can still keep the lid on in your drawer- it's only a problem if you are traveling. They use recycled packaging instead of plastic though, so its hard to complain!
So there you have it, my blush round-up. I hope you learned about a new product that you haven't tried yet! Feel free to let me know about your favorites below, I am always excited to hear about something new!
Are you a follower yet? When I reach my current goal I will do another giveaway so join up and tell your friends!!!
But, I am not actually planning to talk about blushing for real today. I am talking about blushing "for fake."
I got a lot of good feedback on my last make-up post so I thought I would try another!
So, here is my blush round-up. These are all products that I have tried myself and are my favorites. I am not getting paid to write this post, these are all my own opinions :)
 |
| Photo from Stila |
1. My fave Natural/Everyday Option
Stila Convertible Color $25
This is by far my favorite at the moment. This product is in a very creamy, user-friendly form. You just stick your finger in there, pat it on to blend, and you're done. You can layer more on to make the hue more intense, or really blend it in to be subtle. The best part? It's not just for cheeks! It looks great on lips too! I like the color "Lillium" because I am fair-skinned. It's a really pretty soft peachy-pink color. It definitely lasts all day, and you can even layer some powder blush on top if you want. It is WELL worth the price, it will last forever and is a high-quality natural product (no parabens, etc.)
 |
| Photo from Vincent Longo |
2. My fave Evening/Date Night Option
Vincent Longo Lip and Cheek Gel Stain $22.50
This is a fabulous, long-lasting, and highly pigmented option. I love to use this when the occasion calls for a little more drama! It can be a bit challenging to get the hang of and can make a mess of your fingers if you aren't careful. I have found that the applicator is NOT what you want to use to apply it. While it is a gel, it is still quite liquidy. With the high level of pigments, anywhere you put it will be pretty permanent (at least for a day or so) so you need to be careful! If you follow their instructions and have well-hydrated skin and lips before application, it will glide on and blend smoothly. Yes, I said skin and lips because this is another multi-tasking product! If you use it on your lips, a nice gloss over the top looks fantastic. I have the color "Baby Boo". This is another one where a little goes a long way, so you can spend the money knowing it will last a long time!
 |
| Photo from LORAC |
3. A Powder Option for layering
LORAC Powder Blush $20
This is a great, high-quality powder blush. I use the color "Soul" which is a brownish-rose color. It can almost double as a bronzer too. I use powder blush over a cream option usually, to add extra staying power or to brighten the apple of my cheeks. Powder blush is also great for contouring. Another bonus? It is very easy to apply!
 |
| Photo from Physicians Formula |
4. A Bargain Option!
Organic Wear (TM) 100% Natural Origin Blush $11.95
This is a great line of products created by Physician's Formula. You can get it at Drugstores, Grocery Stores, and Ulta. This line is the first ever in the cosmetic world to be certified as having Organic ingredients! (There are other products that have FDA certified ingredients- this is a new cosmetic certification).
I love their face powder, and this blush is fantastic too. It can be soft, or you can add more to build up intensity. I love the color "Blushing Organics". I highly recommend the entire product line as all that I have tried are fantastic (and the price is right!) The only drawback at all is that the pallet tends to wear out where it bends, but its magnetized so you can still keep the lid on in your drawer- it's only a problem if you are traveling. They use recycled packaging instead of plastic though, so its hard to complain!
So there you have it, my blush round-up. I hope you learned about a new product that you haven't tried yet! Feel free to let me know about your favorites below, I am always excited to hear about something new!
Are you a follower yet? When I reach my current goal I will do another giveaway so join up and tell your friends!!!
Friday, February 3, 2012
Super Bowl Week- Post 5 (Super Bowl Funnies!)
Today is my final Super Bowl Post! We've talked FOOD, sewn a TOY FOOTBALL, figured out what to DRINK, and planned our OUTFITS.
Today it is time to LAUGH!
This has been a lot of excitement for our Midwestern city. Not that we never have ANY sports-related excitement (Hello Colts, Pacers, Butler Basketball, NFL combine, Indy 500....) but this is different. There are celebrities everywhere- I mean, everywhere in Super Bowl Village that is. Big celebrities too- here for The Today Show, and Late Night with Jimmy Fallon- here to sing (Madonna, Kelly Clarkson, Adam Levine...and more!)
So everyone has been a little excited. My female friends and cousins (including myself) have all gotten a little ga-ga over Ryan Gosling being here...and we aren't the only ones! Some clever person created this hilarious site with some "Hey Girl" sayings. Have you seen the funny ones on Pinterest??? Well, these ones are Indy specific. Hilarious, go HERE to check out all of them!
The hottest ticket in town besides the big game has been Late Night With Jimmy Fallon. Sadly, my husband and I did not get tickets, but we tried! I did have some cousins who got to go, so jealous!!! Last night, they aired a "Real Housewives of Late Night" that included some Colts "wives". I mean, to see these gigantic manly dudes dressed in drag is truly a spectacle. If you need a laugh, watch this video on the Jimmy Fallon site!!!
Now, I am against releasing the ads before the game. I mean, I am not really a sports person, so the anticipation of the commercials is about as exciting as it gets for me! Now that they've been released, what do I have to look forward to? Dessert. Ah, yes. Dessert. Well, since its been released, HERE is a link to the "Ferris Beuler" Honda CR-V ad.
Today it is time to LAUGH!
This has been a lot of excitement for our Midwestern city. Not that we never have ANY sports-related excitement (Hello Colts, Pacers, Butler Basketball, NFL combine, Indy 500....) but this is different. There are celebrities everywhere- I mean, everywhere in Super Bowl Village that is. Big celebrities too- here for The Today Show, and Late Night with Jimmy Fallon- here to sing (Madonna, Kelly Clarkson, Adam Levine...and more!)
 |
| Photo courtesy HeyGirlIndy.com |
So everyone has been a little excited. My female friends and cousins (including myself) have all gotten a little ga-ga over Ryan Gosling being here...and we aren't the only ones! Some clever person created this hilarious site with some "Hey Girl" sayings. Have you seen the funny ones on Pinterest??? Well, these ones are Indy specific. Hilarious, go HERE to check out all of them!
 |
| credit |
 |
| credit |
Thursday, February 2, 2012
Super Bowl Week- Post 4 (What do you wear?)
So, what does one wear to a Super Bowl Party??? I say anything goes, but for fun, here are some ideas for a few "types" of women :)
1. The Type "A" Hostess
Hosting at your house? Are all of your appetizers made from scratch and perfectly football themed? Did you build that crazy stadium made out of food that's been floating around on Pinterest? Then this outfit might just be for you:


2. The Chick who is there to eat, see the commercials, see the halftime show, and otherwise avoid actually watching the game.
You really like the social aspect of Super Bowl Sunday, not necessarily the sports part. Unless you get to see Tom Brady's handsome face, or Eli Manning's cute little son, you are not going to be looking at the screen :) I threw in some stretchy pants, because eating is your sport of the day, right? If this is you, then you might want to wear something like this:
3. The Sporty Girl
You are actually at the party to, SURPRISE! , watch the game! You have a team you are cheering for and you actually know what a play is, how they score, etc. Maybe you even won your Fantasy Football league this year. You need an outfit that shows off your team spirit- how about something like this?


4. The 9 Months Prego Girl
So, really I just made this outfit for me...no wonder it includes some really cute diamond earrings and slippers :) But seriously, playing around on Polyvore is fun!


Well I hope you enjoyed this post, I had fun making it! If you haven't checked out my previous Super Bowl posts this week please do!
Are you a follower yet? When I reach my current goal I will do another giveaway! So join in on the fun and follow along!
1. The Type "A" Hostess
Hosting at your house? Are all of your appetizers made from scratch and perfectly football themed? Did you build that crazy stadium made out of food that's been floating around on Pinterest? Then this outfit might just be for you:
2. The Chick who is there to eat, see the commercials, see the halftime show, and otherwise avoid actually watching the game.
You really like the social aspect of Super Bowl Sunday, not necessarily the sports part. Unless you get to see Tom Brady's handsome face, or Eli Manning's cute little son, you are not going to be looking at the screen :) I threw in some stretchy pants, because eating is your sport of the day, right? If this is you, then you might want to wear something like this:


You are actually at the party to, SURPRISE! , watch the game! You have a team you are cheering for and you actually know what a play is, how they score, etc. Maybe you even won your Fantasy Football league this year. You need an outfit that shows off your team spirit- how about something like this?
4. The 9 Months Prego Girl
So, really I just made this outfit for me...no wonder it includes some really cute diamond earrings and slippers :) But seriously, playing around on Polyvore is fun!
Well I hope you enjoyed this post, I had fun making it! If you haven't checked out my previous Super Bowl posts this week please do!
Are you a follower yet? When I reach my current goal I will do another giveaway! So join in on the fun and follow along!
Subscribe to:
Posts (Atom)